
Installation manual


©2014 Edelbrock LLC
Part #1596, 1597, 1598, 1599
Brochure #63-1598
Rev. 9/19/14 - QT/mc
Edelbrock E-Force Supercharger System
2010-2014 Camaro SS
Installation Instructions
Page 9
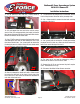
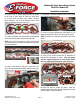
17. Lift the protective cover then use a 10mm socket to
loosen and remove the positive battery terminal.
18. Lift and support the front end of the vehicle using a
service lift or jack and appropriately load rated jack stands
then loosen and remove the lug nuts from both front wheels.
Remove the wheels and set them aside.
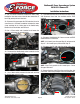
19. Use a T20 Torx wrench to remove the three bolts on each
side holding the front and the two holding the rear of the
front wheel fender liners. Use a panel puller to remove the
five body pins on each side that retain the inner fender wells
then remove them and set them aside.
20. Reach in through the wheel wells with a 10mm socket
to remove the four bolts at the front of each side of the
fascia then use a 7mm socket to remove the two bolts on
each side of the front fascia.
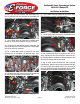
21. Disconnect the fog lamp electrical connectors and the
fascia wiring harness connector on the passenger side.
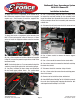
22. Use a 10mm socket to remove the two bolts retaining
the bottom of the fascia.
23. Use a panel puller to remove the six body pins holding
the top of the fascia then use a 10mm socket to remove the
bolt at each end of the top of the fascia.
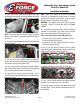
24. The front fascia can now be removed by pulling it
forward off the vehicle. Set front fascia aside.
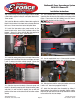
25. Remove the oil fill cap and remove the plastic engine
cover. Reinstall the oil fill cap.
26. Disconnect the Mass Airflow Sensor connector.