Edelbrock 2010-2014 Camaro SS Supercharger Part #’s: 1596, 1597, 1598, 1599, 15997
Edelbrock E-Force Supercharger System 2010-2014 Camaro SS Installation Instructions INTRODUCTION Thank you for purchasing the Edelbrock 6.2L GM Supercharger System for the 2010-14 Chevy Camaro. The Edelbrock E-Force Supercharger System for the Camaro SS utilizes Eaton’s new Gen VI TVS Supercharger rotors, featuring a four lobe design with a full 160 deg. of twist for maximum flow, minimum temperature rise, quiet operation, and the reliability for which Eaton is known.
Edelbrock E-Force Supercharger System 2010-2014 Camaro SS Installation Instructions IMPORTANT WARNINGS Before beginning the installation, use the enclosed checklist to verify that all components are present in the box, then inspect each component for damage that may have occurred in transit. If any parts are missing or damaged, contact Edelbrock Technical Support (800-416-8628), not your parts distributor.
Edelbrock E-Force Supercharger System 2010-2014 Camaro SS Installation Instructions IMPORTANT WARNINGS (CONTINUE) Edelbrock periodically releases improved versions of the calibration file found on the supplied handheld programmer. It is recommended to check the website, www.edelbrock.com, to ensure you have the latest version as described in the PCM Flashing Procedure on Page #9. It is also recommended that you check the Edelbrock Tech Center Website for any updates to this installation manual.
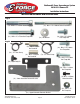
Edelbrock E-Force Supercharger System 2010-2014 Camaro SS Installation Instructions INSTALLATION HARDWARE IDENTIFICATION GUIDE Bag #1 (1x) - M10 x 1.5 x 65mm Socket Head Bolt (3x) - M8 x 1.25 x 100mm Socket Head Bolt (1x) - M10 x 1.5 x 75mm Hex Flange Bolt (2x) - M8 Washer (3x) - M8 x 1.25 x 20mm Hex Flange Bolt Bag #2 (1x) - M6 x 1 x 25mm Hex Stand-Off (4x) - M8 x 1.25 x 20mm Hex Flange Bolt (2x) - 1/2” Hose Clamp (1x) - M5 X .8 X 25mm Hex Stand-Off (7x) - 3/4” Hose Clamp (1x) - M8 x 1.
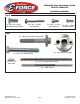
Edelbrock E-Force Supercharger System 2010-2014 Camaro SS Installation Instructions Bag #3 (11x) - M8 x 1.25 x 25mm Countersunk Socket Head Bolt (8x) - M6 x 1 x 45mm Hex Flange Bolt (4x) - M6 x 1 x 12mm Socket Head Bolt (2x) - M6 x 1 x 16mm Button Head Bolt Bag #4 (1x) - GM Factory Harmonic Balancer Bolt Bolt Hole Drill Hole (1x) - Crank Pinning Drill Guide (1x) - M16 x 2 x 120mm Hex Bolt (1x) - 1/4” x 3/4” Steel Dowel Ream Hole (1x) - 15/64” High Speed Steel Drill Bit (1x) - .
Edelbrock E-Force Supercharger System 2010-2014 Camaro SS Installation Instructions Bag #5 (1x) - Coil Cover Dipstick Grommet (4x) - Coil Cover Bracket Grommet (4x) - Coil Cover Bracket (4x) - Coil Cover Retainer Stud (4x) - Coil Cover Standoff ©2014 Edelbrock LLC Part #1596, 1597, 1598, 1599 Page 6 Brochure #63-1598 Rev.
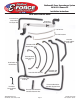
Edelbrock E-Force Supercharger System 2010-2014 Camaro SS Installation Instructions HOSE IDENTIFICATION GUIDE Intercooler Water Pump to Heat Exchanger Hose Heater Core Hose Assembly Fuel Rail Inlet Fuel Rail Crossover Intercooler Reservoir to Water Pump Hose Manifold to EVAP Solenoid Hose (18”) EVAP Solenoid to EVAP Hard Line (21”) Brake Booster to Manifold Hose Driver Side PCV Hose (22”) Passenger Side PCV Hose (24”) Intercooler Hose Assembly Dual Mode Exhaust Splitter Hose ©2014 Edelbrock LLC Par
Edelbrock E-Force Supercharger System 2010-2014 Camaro SS Installation Instructions Supercharger Installation NOTE: It is very important to perform the PCM flashing procedure prior to starting this installation. This will prevent any major installation delays due to non-compatible calibration files. In the rare occurrence that you encounter an error message during the PCM flashing procedure, please refer to Page 28, titled E-mail Edelbrock Your Stock PCM Calibration.
Edelbrock E-Force Supercharger System 2010-2014 Camaro SS Installation Instructions 17. Lift the protective cover then use a 10mm socket to loosen and remove the positive battery terminal. 21. Disconnect the fog lamp electrical connectors and the fascia wiring harness connector on the passenger side. 22. Use a 10mm socket to remove the two bolts retaining the bottom of the fascia. 18.
Edelbrock E-Force Supercharger System 2010-2014 Camaro SS Installation Instructions 27. Use a flat head screwdriver to loosen the worm clamp holding the inlet tube to the air box lid then remove the air box lid by pushing the lock tabs back. 32. Push down the white tab on the front EVAP hose fittings and disconnect them from the manifold and the EVAP solenoid. 28.
Edelbrock E-Force Supercharger System 2010-2014 Camaro SS Installation Instructions 36. Use a 3/8” Fuel Line Removal Tool to disconnect the fuel line from the fuel rails and from the passenger side fender fitting. Use a shop rag to absorb any excess fuel. 41. Use a 10mm socket to remove the nut on the driver side and remove the plastic manifold webbing. 42. Use an 8mm socket to remove the manifold bolt on the driver side retaining the fuel rail bracket. 37.
Edelbrock E-Force Supercharger System 2010-2014 Camaro SS Installation Instructions 45. Use a pair of hose clamp pliers to loosen the clamp retaining the vacuum hose to the brake booster fitting and disconnect the hose. It will be removed with the manifold. NOTE: Steps 50-60 outlines the procedure for disabling the Active Fuel Management system found on Camaros equipped with automatic transmissions. Manual vehicles disregard Steps 50-60 and proceed to Step 61.
Edelbrock E-Force Supercharger System 2010-2014 Camaro SS Installation Instructions 54. Trim the two (2) bosses projecting from the gasket to the base of their tapers to allow the valley plate to sit flush when installed (verify proper clearance before installing). Use a file to remove any burrs, then install the gasket onto the new valley tray. 55. Install the modified valley plate gasket and the supplied valley plate onto the engine and proceed to Step 65.
Edelbrock E-Force Supercharger System 2010-2014 Camaro SS Installation Instructions NOTE: Steps 61-64 are for Manual Transmission vehicles. Disregard otherwise and proceed to Step 65. 67. Use a 15mm socket to remove the two bolts retaining the belt tensioner. WARNING: The supplied valley plate must be used. FAILURE TO DO SO WILL RESULT IN ENGINE DAMAGE. 61. Using a 13mm socket, remove the (11) eleven bolts securing the valley plate, then remove the valley plate.
Edelbrock E-Force Supercharger System 2010-2014 Camaro SS Installation Instructions 71. Install the supplied Heater Core Hose Assembly to the firewall fittings using the supplied hose clamps. Route the lines between the engine oil dipstick and the fuse box to the fittings on the water pump and secure them with the supplied hose clamps. Note that the hose closer to the passenger side of the firewall will be routed to the fitting closer to the front of the vehicle and vice versa. 74.
Edelbrock E-Force Supercharger System 2010-2014 Camaro SS Installation Instructions 78. Apply blue Loctite, or equivalent, to the threads of an M8 x 20mm bolt supplied in Bag #1 then use the supplied washer and a 12mm socket to install the supplied idler pulley onto the tensioner bracket. 82.
Edelbrock E-Force Supercharger System 2010-2014 Camaro SS Installation Instructions 91. Use a breaker bar and a 24mm socket to loosen and remove the crank bolt. A long pipe slid over the breaker bar can be helpful for increasing leverage. 102. Reconnect the starter solenoid electrical connector. 103. Use an 8mm wrench to reinstall the three bolts that hold the starter heat shield in place. 104. Use a 13mm socket to install the two starter bolts. 105.
Edelbrock E-Force Supercharger System 2010-2014 Camaro SS Installation Instructions 109. Secure the top of the heat exchanger with the two M8 x 20mm bolts supplied in Bag #2 and tighten them with a 12mm socket. 110. Install the M8 nuts and M8 x 20mm bolts supplied in Bag #2 into the holes in the lower heat exchanger brackets then use a 12mm wrench and socket to tighten them. 114. Use a Unibit to drill a 1-1/8” hole in the lower radiator shroud to allow the hose to slide onto the water pump outlet fitting.
Edelbrock E-Force Supercharger System 2010-2014 Camaro SS Installation Instructions 118. Use a Unibit to drill a 1-1/8” hole in the radiator shroud on the driver side directly across from the heat exchanger outlet. 2012-’14 Figure - 2b 119. Slide the short section of the Intercooler Hose Assembly through the hole and onto the heat exchanger outlet. Secure it with a 3/4” hose clamp supplied in Bag #2. 121.
Edelbrock E-Force Supercharger System 2010-2014 Camaro SS Installation Instructions 123. FOR 2012 - ‘14 MODEL YEARS ONLY Use a 10mm wrench to install the standoff, supplied in Bag #2, to the stud located on the back of the radiator fan. See Figure 3b 2012-’14 125.
Edelbrock E-Force Supercharger System 2010-2014 Camaro SS Installation Instructions 131. Two of the stock manifold bolt hole provisions in the cylinder heads break into the crankcase and are not used with this supercharger. These must be plugged by installing two button head bolts supplied in Bag #3 in the front passenger side and rear driver side bolt holes to ensure a good seal. 132. Remove the tape covering the intake ports. 133.
Edelbrock E-Force Supercharger System 2010-2014 Camaro SS Installation Instructions 137. Apply o-ring lube to the upper seals of the supplied fuel injectors and install them into the supplied fuel rails so that the electrical connectors are oriented towards the rounded side of the rails. 138. Lower the passenger fuel rail assembly onto the manifold lining up the injectors with their provisions on the manifold. Gently, push down on the rails until the injectors are fully seated.
Edelbrock E-Force Supercharger System 2010-2014 Camaro SS Installation Instructions NOTE: Step 147-148 are for vehicles equipped with Dual Mode Exhaust Systems. Disregard otherwise. NOTE: Step 149 is for vehicles without Dual Mode Exhaust Systems. Disregard otherwise. Vehicles equipped with Dual Mode Exhaust Systems will have to “T” into the driver side PCV hose using the supplied splitter hose. 149. Connect the Driver Side PCV Hose to the straight fitting on the driver side air inlet.
Edelbrock E-Force Supercharger System 2010-2014 Camaro SS Installation Instructions 154. Install the Passenger Side Manifold to Intercooler Reservoir Hose between the manifold and reservoir then secure the reservoir fitting with a hose clamp supplied in Bag #2. Refer to figure 4 on page 20. 161.
Edelbrock E-Force Supercharger System 2010-2014 Camaro SS Installation Instructions 167. Use a 13mm socket to remove the nut from the power stud at the front of the fuse box. Slide the ring connector at the end of the orange wire on the relay harness over the power stud then reinstall the stock nut. 171. Disconnect the stock EVAP solenoid electrical connector and plug it into the color matched receptacle on the relay harness. 168.
Edelbrock E-Force Supercharger System 2010-2014 Camaro SS Installation Instructions 175. Install the grommet supplied in Bag #6 in the hole on the passenger side coil cover. 176. Slide the front fascia back into place and secure it by reinstalling the stock fasteners, reversing the disassembly process. 187. Lubricate the grommet on the passenger side coil cover then install it by sliding the grommet down and around the dipstick tube and pressing the ball studs into the bracket grommets. 177.
Edelbrock E-Force Supercharger System 2010-2014 Camaro SS Installation Instructions E-mail Edelbrock Your Stock Vehicle Calibration In the rare occurrence that you encounter an error message that reads “Calibration not supported” during the PCM flashing procedure on page 8, you will need to e-mail your stock vehicle calibration to Calibration@ edelbrock.com. Otherwise, disregard this step. • Begin by downloading the SCT device updater software to your computer; it can be downloaded from: http://www.