Edelbrock 2010 Camaro SS Supercharger Part #1596, #1597, #1598 & #1599
Edelbrock E-Force Supercharger System for the 2010 Camaro SS Installation Instructions INTRODUCTION Thank you for purchasing the Edelbrock 6.2L GM Supercharger System for the 2010 Chevy Camaro. The Edelbrock EForce Supercharger System for the 2010 Camaro SS utilizes Eaton’s new Gen VI TVS Supercharger rotors, featuring a four lobe design with a full 160 deg. of twist for maximum flow, minimum temperature rise, quiet operation, and the reliability for which Eaton is known.
Edelbrock E-Force Supercharger System for the 2010 Camaro SS Installation Instructions Proper installation is the responsibility of the installer. Improper installation will void warranty and may result in poor performance and engine or vehicle damage. Due to the complexity of the Edelbrock E-Force Supercharging system, it is recommended that this system only be installed by a qualified professional with access to a service lift, pneumatic tools, and a strong familiarity with automotive service procedures.
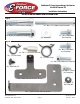
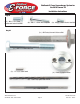
Edelbrock E-Force Supercharger System for the 2010 Camaro SS Installation Instructions INSTALLATION HARDWARE IDENTIFICATION GUIDE Bag #1 (3x) - M8 x 1.25 x 100mm Socket Head Bolt (1x) - M10 x 1.5 x 65mm Socket Head Bolt (1x) - M10 x 1.5 x 65mm Hex Flange Bolt (2x) - M8 Washer (3x) - M8 x 1.25 x 20mm Hex Flange Bolt Bag #2 (4x) - M8 x 1.25 x 20mm Hex Flange Bolt (1x) - M6 x 1 x 25mm Hex Stand-Off (2x) - 1/2” Hose Clamp (7x) - 3/4” Hose Clamp (1x) - M8 x 1.
Edelbrock E-Force Supercharger System for the 2010 Camaro SS Installation Instructions Bag #3 (11x) - M8 x 1.25 x 25mm Countersunk Socket Head Bolt (8x) - M6 x 1 x 45mm Hex Flange Bolt (4x) - M6 x 1 x 12mm Socket Head Bolt Bag #4 (1x) - GM Factory Harmonic Balancer Bolt (1x) - M16 x 2 x 120mm Hex Bolt Bolt Hole Drill Hole (1x) - 1/4” x 3/4” Steel Dowel Ream Hole (1x) - Crank Pinning Drill Guide (1x) - 15/64” High Speed Steel Drill Bit (1x) - .
Edelbrock E-Force Supercharger System for the 2010 Camaro SS Installation Instructions Bag #5 (1x) - Coil Cover Dipstick Grommet (4x) - Coil Cover Bracket Grommet (4x) - Coil Cover Bracket (4x) - Coil Cover Retainer Stud (4x) - Coil Cover Standoff ©2011 Edelbrock LLC Part #1596, 1597, 1598 & 1599 Page 5 Brochure #63-1598 Rev.
Edelbrock E-Force Supercharger System for the 2010 Camaro SS Installation Instructions HOSE IDENTIFICATION GUIDE Intercooler Water Pump to Heat Exchanger Hose Heater Core Hose Assembly Fuel Rail Inlet Fuel Rail Crossover Intercooler Reservoir to Water Pump Hose Manifold to EVAP Solenoid Hose (18”) Brake Booster to Manifold Hose EVAP Solenoid to Fender Fitting Hose (15”) Driver Side PCV Hose (22”) Passenger Side PCV Hose (24”) Intercooler Hose Assembly Driver Side Manifold to Intercooler Reservoir
Edelbrock E-Force Supercharger System for the 2010 Camaro SS Installation Instructions 1. Open trunk and lift trunk liner to access plastic hold down. Unscrew plastic hold down then remove air compressor and foam support. 6. Reach in through the wheel wells with a 10mm socket to remove the four bolts at the front of each side of the fascia then use a 7mm socket to remove the two bolts on each side of the front fascia. 2. Use a 10mm socket to loosen and remove the negative battery terminal. 7.
Edelbrock E-Force Supercharger System for the 2010 Camaro SS Installation Instructions 11. Disconnect the Mass Airflow Sensor connector. 17. Use a 10mm socket to remove the four bolts retaining the throttle body and set it aside. 12. Use a flat head screwdriver to loosen the worm clamp holding the inlet tube to the air box lid then remove the air box lid by pushing the lock tabs back. 18. Push down the white tab on the front EVAP hose fittings and disconnect them from the manifold and the EVAP solenoid.
Edelbrock E-Force Supercharger System for the 2010 Camaro SS Installation Instructions 22. Disconnect the two ignition harness connectors, the eight spark plug wires from the ignition coils and the eight fuel injector electrical connectors. 27. Use a 10mm deep socket to remove the four fuel rail studs. Remove the fuel rail bracket then remove the rails by lifting the injectors straight up out of their provisions then work the rails forward and set them aside. 28.
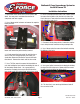
Edelbrock E-Force Supercharger System for the 2010 Camaro SS Installation Instructions 32. Use a pair of hose clamp pliers to loosen the clamp retaining the vacuum hose to the brake booster fitting and disconnect the hose. It will be removed with the manifold. 37. Use a T-20 Torx driver to remove the four bolts retaining the plastic solenoid bracket, then pry open the clip at the rear of the plate to remove the bracket. 38. Rotate each solenoid 90° and remove them. 33.
Edelbrock E-Force Supercharger System for the 2010 Camaro SS Installation Instructions 46. Install the new valley plate on the engine carefully so as not to dislodge the o-rings and line up the bolt holes. 47. Apply anti-seize to the underside of the heads of the eleven countersunk bolts from Bag #3 then use a 5mm Allen tool to install them in the plate. Torque them to 18 ft-lbs from the center out. 51. Disconnect the two heater hoses from the firewall using a shop rag to absorb any excess coolant. 52.
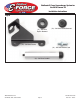
Edelbrock E-Force Supercharger System for the 2010 Camaro SS Installation Instructions 54. Apply blue Loctite to the threads of the M8 x 20mm bolt supplied in Bag #1 then use a 12mm socket and washer to install the smaller supplied idler pulley onto the supplied idler bracket. 55. Use a 10mm socket to remove the three water pump bolts indicated. 58. Apply blue Loctite to the threads of the stock tensioner bolts then use a 15mm socket to install the supplied tensioner bracket to the water pump. 59.
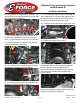
Edelbrock E-Force Supercharger System for the 2010 Camaro SS Installation Instructions 63. Use pliers to loosen the hose clamps and disconnect the two small upper radiator hoses. Use caution when removing and reinstalling hoses onto plastic fittings. 69. Disconnect electrical connector at top of starter. 70. Use a 13mm socket to remove the nuts retaining power wires to the starter. 71. Remove and set aside the starter and bracket. 72.
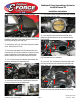
Edelbrock E-Force Supercharger System for the 2010 Camaro SS Installation Instructions 79. Use compressed air to clean out any metal flakes then loosen the bolt and remove the drill guide. 90. Install the supplied heat exchanger behind the bumper so that the lower bracket holes line up with those in the radiator shroud. 80. Apply red Loctite retaining compound to the supplied crank pin and tap it into the reamed hole until it is flush with the crank snout. 81.
Edelbrock E-Force Supercharger System for the 2010 Camaro SS Installation Instructions 94. Install the water pump to heat exchanger hose on the passenger side inlet fitting of the heat exchanger and clock it until it contacts the lower radiator shroud. Secure the fitting with a 3/4” hose clamp supplied in Bag #2. 99. Install the Intercooler Hose Assembly by sliding it down between the radiator fan assembly and the engine.
Edelbrock E-Force Supercharger System for the 2010 Camaro SS Installation Instructions 105. Install the intercooler reservoir to water pump hose onto the outlet of the intercooler reservoir so that the other end will extend down to the inlet of the intercooler water pump. Secure the hose to the reservoir fitting with a supplied hose clamp. 110. Install the factory o-ring intake seals into the machined grooves of the supercharger flanges. 106.
Edelbrock E-Force Supercharger System for the 2010 Camaro SS Installation Instructions 116. Use a 10mm universal socket to install the M6 x 45mm intake manifold bolts supplied in Bag #3 and torque them to 89 in/lbs in the sequence shown below. 120.
Edelbrock E-Force Supercharger System for the 2010 Camaro SS Installation Instructions 126. Use a small flat blade screwdriver to remove the wire loom covers from the back of the ignition coil brackets. 132. Use a 10mm socket to reinstall the coil brackets using the five stock studs on each side then reconnect the ignition coil harness electrical connectors and the spark plug wires to the ignition coils. 133.
Edelbrock E-Force Supercharger System for the 2010 Camaro SS Installation Instructions 137. Use a 16mm wrench to install the coil cover standoffs on the valve covers. 141. Use a T20 Torx bit to remove the MAF sensor from the stock air box cover and install it in the supplied air box cover. The arrow on the side of the sensor should point back towards the supercharger. 142. Replace the stock air filter with the one supplied. 143.
Edelbrock E-Force Supercharger System for the 2010 Camaro SS Installation Instructions 147. Install the relay on the tab on the passenger side of the fuse box and the fuse housing on the brace directly in front of the fuse box using the body pins supplied in Bag #2. 152. Carefully route the Passenger Side PCV Hose to the fitting on the underside of the silicone air inlet tube so as to avoid contact with the serpentine belt or any pulleys. 148.
Edelbrock E-Force Supercharger System for the 2010 Camaro SS Installation Instructions 156. Reconnect the fog light electrical connectors and the fascia wiring harness connector on the passenger side. 167. Use the directional pad to highlight the Preprogrammed Tune option and press the Select button. 157. Use a 10mm socket to reconnect the positive battery terminal. 168. Read disclaimer then press Select to continue. 169.
Edelbrock E-Force Supercharger System for the 2010 Camaro SS Installation Instructions 177. Start the car and allow it to idle while closely inspecting the engine bay for any fuel or coolant leaks. Repair any leaks before operating vehicle! 178. Remove the engine oil dipstick. 179. Lubricate the grommet on the passenger side coil cover then install it by sliding the grommet down and around the dipstick tube and pressing the ball studs into the bracket grommets. 180.
Edelbrock E-Force Supercharger System for the 2010 Camaro SS Installation Instructions Additional Supporting Components Now that the horsepower potential of your Camaro has been substantially increased, Edelbrock strongly recommends upgrading the suspension, exhaust and braking systems in order to fully utilize these gains. The following components have been designed specifically to enhance the handling and acceleration capabilities of your Camaro when used in conjunction with the E-Force Supercharger.
Edelbrock E-Force Supercharger System for the 2010 Camaro SS Installation Instructions Edelbrock shorty headers have outstanding performance features such as mandrel-bent tubes and laser-cut or stamped flanges. They are direct replacements for stock manifolds, so installation is simple using the factory crossover pipe. Headers are made of durable 16-gauge mild steel and are 50-state street legal. Two finishes are available: Ti-Tech or ceramic coating. Shorty Headers for 2010 Camaro SS: Ti-Tech Coated......