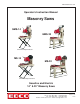
E-MS-GMS14&20-I-1002 Operator’s Instruction Manual Masonry Saws GMS-14 GMS-20 Shown with Optional Stand MS-14 MS-20 Shown with Optional Stand Gasoline and Electric 14” & 20” Masonry Saws 100 Thomas Johnson Drive, Frederick, MD 21702-4600 USA Phone (301) 663-1600 • 1-800-638-3326 Fax (301) 663-1607 • 1-800-447-3326 Website: www.edcoinc.com • Email: sales@edcoinc.
E-MS-GMS14&20-I-1002 READ AND UNDERSTAND THE OPERATORS INSTRUCTION MANUAL THOROUGHLY BEFORE ATTEMPTING TO OPERATE THIS EQUIPMENT. Death or serious injury could occur if this machine is used improperly. SAFETY MESSAGES • Safety Instructions are proceeded by a graphic alert symbol of DANGER, WARNING, or CAUTION. Indicates an imminent hazard which, if not avoided, will result in death or serious injury. Indicates an imminent hazard which, if not avoided, can result in death or serious injury.
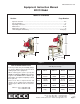
E-MS-GMS14&20-I-1002 Equipment Instruction Manual EDCO Model Table of Contents Section Page Number Operator Controls ...........................................................................................................4-5 Safety Guidelines ....................................................................................................................6 Operating Instructions .....................................................................................................7-11 Maintenance ....
E-MS-GMS14&20-I-1002 Operator Controls - GMS Models GMS-14 (Figure 2) & GMS- 20 (Figure 3) A B. C. D. E. F. G. H. I. J. K. L. M. N. O. P. Q. R. S. T.
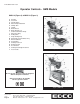
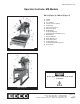
E-MS-GMS14&20-I-1002 Operator Controls- MS Models MS-14 (Figure 4) & MS-20 (Figure 5) A. B. C. D. E. F. G. H. I. J. K. L. M. N. O. P. Q. Handle Motor Reset Button Voltage Selector Switch Power Cord Water Pick Up Hose Water Tray Plug Rolling Table Angle Cutting Stop Welded Steel Frame/Water Tray Blade Guard Drive Belt Guard Blade Guard Lock Motor Starter Box Cutting Angle Lock Cutting Head Height Positioner Foot Treadle Figure 4 (MS-14) Electric motor must be properly grounded at all times.
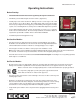
E-MS-GMS14&20-I-1002 Read and understand this Operator’s Instruction Manual, and the Engine Manufacturer’s Owner’s Manual before operating this equipment. Death of serious injury can result if this machine is used improperly. Safety Guidelines Eye and ear protection must be worn at all times while the saw is in use. During normal operation, sound pressure levels exceed 92dBA. Use only ANSI approved safety glasses to help prevent eye injury.
E-MS-GMS14&20-I-1002 Operating Instructions Before Starting: • Read and understand the instructions supplied by the engine manufacturer. • Familiarize yourself with all engine and saw controls. (Figures 2-5) • Visually inspect the entire machine for damage or wear. Look for signs of oil or fuel leaks. Remove excess dirt or debris. Check that all nuts, bolts and screws are tight.
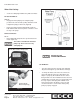
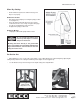
E-MS-GMS14&20-I-1002 When Wet Cutting: • Secure the drain plug and fill the tray with clean water. On Gasoline Models: GMS-20 • Engage the water pump by loosening the pump position lock, lower the water pump slide bracket and retighten the pump position lock. (Figure 9) • Prime the pump using the priming bulb. Pump the bulb until water fills the clear plastic coolant hose from the tray to the pump. On Electric Models: MS-14 • Plug submersible pump into the special outlet on the motor.
E-MS-GMS14&20-I-1002 When Dry Cutting: • Drain and flush any water or debris in the tray and dispose of properly. On Gasoline models: • Disengage water pump by loosening the pump position lock. (Figure 12) • Raise the water pump slide bracket to loosen belt around the sheave. Loosen only enough to disengage the unit, do not allow belt to slip off sheave. • Retighten the pump position lock. On Electric Models: • Unplug the submersible pump from the motor.
E-MS-GMS14&20-I-1002 Starting the Engine: • Be sure blade is clear of item to be cut. • Determine that the recoil starter assembly turns freely, starter rope pulls easily, and the rope retracts properly. • Follow the instructions supplied in the Engine Manufacturer’s Owner’s Manual for starting engine. • Open the throttle and allow engine to reach operating temperature. Open throttle fully, do not use the throttle as a means to match the arbor shaft speed to the specified blade speed requirements.
E-MS-GMS14&20-I-1002 Cutting: • Do not strain the engine/motor while cutting. Do not jam work piece into the blade. Do not twist the work piece while cutting. • When you have finished cutting: On gasoline models: To stop engine, return throttle to idle. Stop the engine by turning the engine mounted stop switch to the OFF position. Do not leave the saw running unattended. On electric models: Depress the stop botton on the motor starter box.
E-MS-GMS14&20-I-1002 Disconnect spark plug lead before performing any maintenance on this machine. Maintenance Consult the Engine Manufacturer’s Owner’s Manual for more detailed engine maintenance instructions. Changing the Blade: • Inspect the new blade thoroughly before installing. Check for cracks, loose or missing segments, worn or out-ofround arbor holes. Refer to the Rx for Diamond Blades pamphlet provided with your blade for more detailed information on inspecting blades.
E-MS-GMS14&20-I-1002 Belt Adjustment and Replacement: • • • Periodically check belts for damage, same type and are at the proper tension. Do not mix belts. Slipping belts will overheat causing the cutting speed to be limited and shorten the life of the belts. Over-tensioned belts will shorten the life of the belts and bearings. On new equipment and after installing new belts of the same type, be certain to re-tension the belts after the first 4 hours of use.
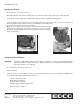
E-MS-GMS14&20-I-1002 Grease Bearings: • Drive shaft bearings must be greased every 4 hours. (All are not visible in this photo) Grease Fittings Figure 23 Change Engine Oil: Dip Stick • Check Engine Oil before each operation. Open the filler cap and look at the dip stick. (Figure 24) Oil should be clearly visable both on the stick and in the cavity and should look fairly clean. Running the machine on dirty oil or when the oil is low will result in damage to the engine.
E-MS-GMS14&20-I-1002 Repairs are to be preformed by EDCO or by approved EDCO repair technicians. Read and follow all instructions in the Engine Manufacturer’s Owner’s Manual.
E-MS-GMS14&20-I-1002 LIMITED EQUIPMENT WARRANTY Equipment Development Company, Inc. herein referred to as EDCO warrants that each new unit manufactured by EDCO to be free from defects in material and workmanship in normal use and service for a period of (1) one year (except in the case of the cutter drum assembly on all model concrete asphalt planes, in which case the warranty period shall be 90 days) from date of shipment to the original buyer or equipment rental center owner.