
Product Manual


SE-1200 Series Electrocardiograph User Manual Printing ECG Reports
- 56 -
Chapter 8 Printing ECG Reports
There are four modes to print ECG reports.
In the auto mode, the lead groups are switched automatically according to the lead sequence
during the printing course. After the ECG waves of one lead group are printed within a certain
time, the system switches to print ECG waves of another lead group automatically. A 1mV
calibration mark will be printed at the beginning of an ECG report.
In the manual mode, you can determine the lead group to be displayed and printed by pressing the
Up or Down arrow.
In the rhythm mode, you can print 60s rhythm-lead ECG waveform of one lead in the Single
Lead style or 20s rhythm-lead ECG waveform of three leads in the Three Leads style.
In the R-R analysis mode, you can select a lead to print its R-R histogram, R-R trend chart, 180s
compressed ECG waveform and all the R-R interval values.
NOTE:
1. The working mode can not be changed during the printing course. Stop printing reports
before changing the working mode.
2. Within three seconds after returning to the main screen, if you press the START/STOP
key to print an ECG report in the auto quick mode or the manual mode, the recorder
will not respond.
3. The electrocardiograph can not print ECG reports when transmitting data through USB
socket 2.
8.1 Auto Mode
Operation Method:
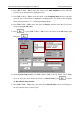
1. To set Mode Options, Auto DispStyle, Sampling Mode, Preview, Record Style, Rhythm
Lead1/2/3, or Lead Sequence (Optional)
When the main screen is displayed, press the function key F6 below Setup to open the
System Setup screen. The cursor is on Work Mode. Press
to open the Work
Mode Setup window.
1) Press Tab or Shift + Tab to move the cursor to AUTO, press Spacebar to select it, and
then a check mark √ appears in the box before AUTO.