
User's Manual


Acclarix LX3 Series Diagnostic Ultrasound System User Manual Transducers and Biopsy
- 80 -
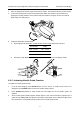
6.6 Center Line
The Center Line is a vertical dotted line displayed at the middle of the image field, representing the
middle of ultrasound beam. The Center Line helps to locate the position and depth of a target disease
focus for out-of-plane biopsy, lithotripsy and etc..
To use Center Line:
1. Press Center-Line on B-mode touch screen to activate Center Line.
2. A dotted center line with a depth marker is displayed vertically at the middle of the image field.
The position and direction of the center line cannot be changed.
3. Move the transducer to locate the target.
4. Move the marker to the target and its depth will be displayed blow the image.
Note:
Center Line is not available on Intra-cavity transducer E8-4Q.
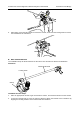
6.7 Needle Guide Bracket Cleaning and Sterilization
NOTE:
1. Use proper sterilization technique at all times when performing a biopsy.
2. Ensure that protective gloves are worn.
WARNING
1. The needle guide bracket kits are not disinfected or sterilized before delivery. The operators must
clean and sterilize the needle guide bracket kits before the first use and after each use.
2. Inspect the bracket for damage such as cracks or breakage. If damage is evident, discontinue
use of bracket and contact your Edan representative for disposal guidance.
3. Sterilize the bracket before disposal or sending back to manufacturer for repair.
6.7.1. Cleaning
1. Wear sterile protective gloves to prevent infection.
2. Disconnect the needle guide bracket from the transducer after each use, and remove all visible
residues from the needle guide bracket using a small and soft-bristled brush or other similar
devices. Do the cleaning quickly before the needle guide bracket dries out.
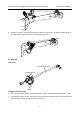
3. Soak the needle guide bracket in the cleaning solution (Ethanol 75% or Isopropanol 70%) for at
least five minutes. Use a soft-bristled brush to clean the needle guide bracket during the soaking.
4. Take out the needle guide bracket from the cleanser and wipe all residues with a sterile cloth.
5. Let the bracket air dry, or dry the bracket with a sterile cloth.
6. If the bracket is not visually clean at the end of the cleaning steps, please repeat the cleaning
steps through step 3 to step 5.
7. Inspect the bracket to ensure that there is no damage. The bracket should be disposed of properly
when any damage is found.