
User's Manual
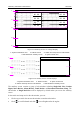
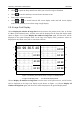
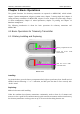
Table Of Contents
- Statement
- Responsibility of the Manufacturer
- Terms Used in this Manual
- Chapter 1 Intended Use and Safety Guidance
- Chapter 2 Overview
- Chapter 3 Installation of Telemetry Monitoring System
- Chapter 4 Basic Operations
- Chapter 5 Patient Management
- Chapter 6 Patient Sector
- Chapter 7 Viewing Single Bed
- Chapter 8 Setting Telemetry Transmitters via MFM-CMS
- Chapter 9 Review
- Chapter 10 System Setup
- Chapter 11 Alarm Management
- Chapter 12 Alarm Information
- Chapter 13 Printing
- Chapter 14 Database Management
- Chapter 15 Monitoring ECG
- 15.1 Overview
- 15.2 ECG Safety Information
- 15.3 ECG Display
- 15.4 Selecting Calculation Lead
- 15.5 Changing Size of ECG Waveform
- 15.6 Changing ECG Filter Settings
- 15.7 ECG Alarm Settings
- 15.8 Monitoring Procedure
- 15.9 Installing Electrodes
- 15.10 Setting Alarm Source
- 15.11 Smart Lead Off
- 15.12 Setting Pace Status
- 15.13 ECG Calibration
- 15.14 ECG Waveform Settings
- 15.15 ST Segment Monitoring
- 15.16 Arr. Monitoring
- Chapter 16 Monitoring RESP
- Chapter 17 Monitoring SpO2
- Chapter 18 Monitoring PR
- Chapter 19 Using Battery
- Chapter 20 Safety
- Chapter 21 Care and Cleaning
- Chapter 22 Maintenance
- Chapter 23 Warranty and Service
- Chapter 24 Accessories
- A Product Specifications
- B EMC Information
- C Default Settings
- D Abbreviation

Telemetry Transmitter User Manual Installation of telemetry monitoring system
NOTE:
Crossover Ethernet cable is connected with computer and parallel Ethernet cable is
connected with HUB.
3.6 Checking the Printer
If an external printer is required, please confirm the printer is powered on and paper is properly
installed in the slot. If it is not powered on or no paper exists, please power the printer on
according to power requirements in MFM-CMS Central Monitoring System User Manual and put
appropriate paper.
WARNING
External device connected with system, such as printer or speaker, should be in
accordance with power requirements for system.
3.7 Checking the Telemetry Monitoring System
Make sure there is no damage on the measurement accessories and cables. Then turn on the
telemetry and MFM-CMS, check whether the system can start normally. Make sure battery for
telemetry transmitter has enough power, MFM-CMS can alarm normally and the alarm sound is
heard.
WARNING
If any signs of damage are detected, or screen displays error messages, do not use it on
any patient. Contact service center immediately.
NOTE:
1 Check all functions applicable and make sure that the system is in good status.
2 If telemetry transmitter is in low battery power status (0 level), replace battery to
ensure the electric power is enough.
3.8 Setting Date and Time
Setting and displaying date and time is applicable to MFM-CMS only.
The user can set the correct date and time and their desired format. There are three kinds of date
format: yyyy-MM-dd, dd-MM-yyyy, MM-dd-yyyy, two kinds of time format: HH-mm-ss (24
hours) and hh-mm-ss tt (12 hours), and three date separator: /, - and. To change the date and time
setup, please select Main Screen > System Setup > Common Setup > Date /Time Setup, and
select the desired settings from the right menu. The time and date displayed on the main screen
will also change after change the date and time setup and their format.
- 26 -