
User's Manual
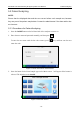
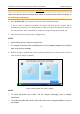
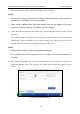
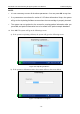
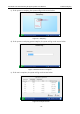
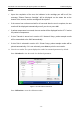
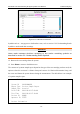
Table Of Contents
- About this Manual
- Statement
- Responsibility of the Manufacturer
- Terms Used in this Manual
- Table of Contents
- Chapter 1 Safety Guide
- Chapter 2 System Overview
- Chapter 3 Installation Guide
- Chapter 4 Setup
- Chapter 5 Patient Analyzing
- Chapter 6 Quality Control (QC) Tests
- Chapter 7 Data Management
- Chapter 8 Online Update
- Chapter 9 Troubleshooting
- Chapter 10 Cleaning, Care and Maintenance
- Chapter 11 Theory
- Chapter 12 Parameters
- Chapter 13 Warranty and Service
- Appendix 1 Specifications
- Appendix 2 Measurement Ranges
- Appendix 3 Reference Ranges
- Appendix 4 EMC Information
- Appendix 5 FCC Information
- Appendix 6 Order List

i15 Blood Gas and Chemistry Analysis System User Manual Patient Analyzing
- 58 -
7. Insert the syringe or capillary tube into the fillport of the cartridge.
NOTE:
When using a syringe, discard the first 2 drops of blood sample first, then remove the
needle from it, and finally insert it into the fillport.
When using a capillary tube, insert the capillary tube into the adaptor till the tube
reaches the interface between the adaptor and the cartridge.
8. Gently insert the cartridge into the cartridge port, and carefully press down to ensure it clicks
into place.
For a valid cartridge, the indicator in the cartridge port will turn green, and the system will
automatically aspirate calibrant. For an invalid cartridge, the indicator will turn red, the
cartridge will be ejected and a message will pop up to prompt you.
NOTE:
Never inject the sample. It will be aspirated automatically.
The cartridge can not be removed from the analyzer until the measurement is
complete.
9. Enter patient information. The screen displayed depends on the selection in section 4.3.2
Patient Information Setup. The screen for the default patient information setup is shown
below:
Figure 5-4 Enter Patient Data