
User's Manual
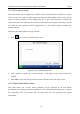
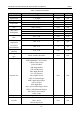
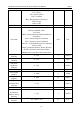
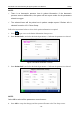
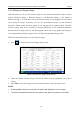
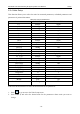
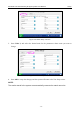
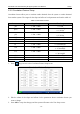
Table Of Contents
- About this Manual
- Statement
- Responsibility of the Manufacturer
- Terms Used in this Manual
- Table of Contents
- Chapter 1 Safety Guide
- Chapter 2 System Overview
- Chapter 3 Installation Guide
- Chapter 4 Setup
- Chapter 5 Patient Analyzing
- Chapter 6 Quality Control (QC) Tests
- Chapter 7 Data Management
- Chapter 8 Online Update
- Chapter 9 Troubleshooting
- Chapter 10 Cleaning, Care and Maintenance
- Chapter 11 Theory
- Chapter 12 Parameters
- Chapter 13 Warranty and Service
- Appendix 1 Specifications
- Appendix 2 Measurement Ranges
- Appendix 3 Reference Ranges
- Appendix 4 EMC Information
- Appendix 5 FCC Information
- Appendix 6 Order List

i15 Blood Gas and Chemistry Analysis System User Manual Setup
- 49 -
4.3.3 Reference Ranges Setup
With this menu you can set the reference range for each measured parameter. There are three
options: Reference Range 1, Reference Range 2, and Reference Range 3. The default is
Reference Range 1. A result that is out of the reference range will be flagged with an up/down
arrow. Reference ranges are factory set to be the measurement ranges for each measured
parameter. Values outside reference ranges are not flagged with an up/down arrow. Therefore
reference ranges must be set according to internal procedures at your individual institution.
Because reference ranges may vary with demographic factors such as age, gender and heritage, it
is recommended that reference ranges be set according to the population being tested.
Follow the instructions below to set the reference ranges:
1. Press to access the Reference Ranges Setup screen.
Figure 4-14 Reference Ranges Setup Screen
2. Select the desired reference range, and edit the limits for those parameters you want to
change.
3. Press OK to accept the changes, and the system will return to the Test Setup screen.
NOTE:
If unacceptable values are entered, the system will display the correct range.
The limits entered will be saved in the system even after the system is shut down.