
User's Manual
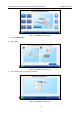
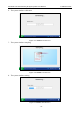

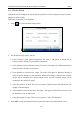
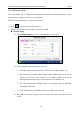
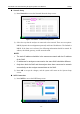
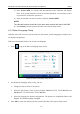
Table Of Contents
- About this Manual
- Statement
- Responsibility of the Manufacturer
- Terms Used in this Manual
- Table of Contents
- Chapter 1 Safety Guide
- Chapter 2 System Overview
- Chapter 3 Installation Guide
- Chapter 4 Setup
- Chapter 5 Patient Analyzing
- Chapter 6 Quality Control (QC) Tests
- Chapter 7 Data Management
- Chapter 8 Online Update
- Chapter 9 Troubleshooting
- Chapter 10 Cleaning, Care and Maintenance
- Chapter 11 Theory
- Chapter 12 Parameters
- Chapter 13 Warranty and Service
- Appendix 1 Specifications
- Appendix 2 Measurement Ranges
- Appendix 3 Reference Ranges
- Appendix 4 EMC Information
- Appendix 5 FCC Information
- Appendix 6 Order List

i15 Blood Gas and Chemistry Analysis System User Manual Setup
- 41 -
Network Setup
1) Press Network to access the Network-Network Setup screen.
Figure 4-5 Network – Network Setup Screen
2) Select the way that the analyzer is connected to the network. There are two options:
DHCP (dynamic host configuration protocol) and Static IP addresses. The Default is
DHCP. If the latter one is selected, the following information should be entered: IP
address, the default gateway, and the network mask.
NOTE:
The static IP address should be in the same area network with the IP address
of the DMS.
IP addresses for analyzers connected to the same DMS should be different.
Only when both the DMS and the analyzer have been connected to network
successfully can the analyzer transmit data to the DMS.
3) Press OK to accept the changes, and the system will return to the System Setup
screen.
WIFI Connection
1) Press WIFI to access the WIFI Setup screen.
Figure 4-6 Network - WIFI Setup Screen