
User's Manual
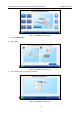

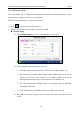
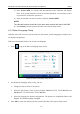
Table Of Contents
- About this Manual
- Statement
- Responsibility of the Manufacturer
- Terms Used in this Manual
- Table of Contents
- Chapter 1 Safety Guide
- Chapter 2 System Overview
- Chapter 3 Installation Guide
- Chapter 4 Setup
- Chapter 5 Patient Analyzing
- Chapter 6 Quality Control (QC) Tests
- Chapter 7 Data Management
- Chapter 8 Online Update
- Chapter 9 Troubleshooting
- Chapter 10 Cleaning, Care and Maintenance
- Chapter 11 Theory
- Chapter 12 Parameters
- Chapter 13 Warranty and Service
- Appendix 1 Specifications
- Appendix 2 Measurement Ranges
- Appendix 3 Reference Ranges
- Appendix 4 EMC Information
- Appendix 5 FCC Information
- Appendix 6 Order List

i15 Blood Gas and Chemistry Analysis System User Manual Setup
- 39 -
4.2.1 Printer Setup
This menu lets you configure the printer that the system uses, what are printed in reports, and the
number of copies it prints.
Follow the steps below to set the printer:
1. Press to access the Printer Setup screen.
Figure 4-3 Printer Setup Screen
2. On the Printer Setup screen, you can:
Select whether to print patient information. The mark √ will appear if Patient Info is
selected, and the default is to print patient information.
Select whether to print calibration results. The mark √ will appear if Calibration Results is
selected, and the default is to print them.
Select whether to print reference ranges. The mark √ will appear if Reference Ranges is
selected, and the default is to not print them. If Reference Ranges is selected, the reference
ranges will be contained in the patient sample report, and the acceptable ranges will be
contained in the control test report.
Select the printer to be used. There are two options: Thermo Printer and USB Printer. The
default is Thermo Printer.
Select whether to turn on Auto Print. The mark √ will appear if Auto Print is turned on, and
the default is to turn on Auto Print.
Select the number of copies. There are two options: 1 and 2. The default is 1.
3. Press OK to accept the changes, and the system will return to the System Setup screen.