
User's Manual
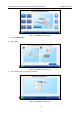
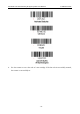

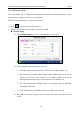
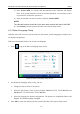
Table Of Contents
- About this Manual
- Statement
- Responsibility of the Manufacturer
- Terms Used in this Manual
- Table of Contents
- Chapter 1 Safety Guide
- Chapter 2 System Overview
- Chapter 3 Installation Guide
- Chapter 4 Setup
- Chapter 5 Patient Analyzing
- Chapter 6 Quality Control (QC) Tests
- Chapter 7 Data Management
- Chapter 8 Online Update
- Chapter 9 Troubleshooting
- Chapter 10 Cleaning, Care and Maintenance
- Chapter 11 Theory
- Chapter 12 Parameters
- Chapter 13 Warranty and Service
- Appendix 1 Specifications
- Appendix 2 Measurement Ranges
- Appendix 3 Reference Ranges
- Appendix 4 EMC Information
- Appendix 5 FCC Information
- Appendix 6 Order List

i15 Blood Gas and Chemistry Analysis System User Manual Installation Guide
- 35 -
9. The system simulates displaying test results.
Figure 3-20 DEMO Test Screen 7
10. Press Home to return.
11. Follow the steps as described in 3.3.5 to logout of the system.
3.3.10 Connecting Peripherics
Connect peripherics with the system through USB ports, and make sure that the system meets the
requirements in IEC60601-1-1.
NOTE:
Only peripherics recommended by EDAN should be connected.
Make sure that the whole system meets the requirements in IEC60601-1-1.
Follow the steps below to set a Honeywell 1900 scanner:
1. Connect a Honeywell 1900 scanner to the analyzer through a USB port.
2. Hold the scanner with your right hand, and trigger the scanner with your forefinger.
3. Scan the following bar codes in sequence.