
User's Manual
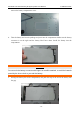
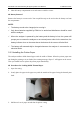
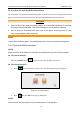

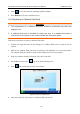
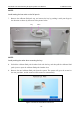
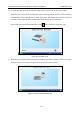

Table Of Contents
- About this Manual
- Statement
- Responsibility of the Manufacturer
- Terms Used in this Manual
- Table of Contents
- Chapter 1 Safety Guide
- Chapter 2 System Overview
- Chapter 3 Installation Guide
- Chapter 4 Setup
- Chapter 5 Patient Analyzing
- Chapter 6 Quality Control (QC) Tests
- Chapter 7 Data Management
- Chapter 8 Online Update
- Chapter 9 Troubleshooting
- Chapter 10 Cleaning, Care and Maintenance
- Chapter 11 Theory
- Chapter 12 Parameters
- Chapter 13 Warranty and Service
- Appendix 1 Specifications
- Appendix 2 Measurement Ranges
- Appendix 3 Reference Ranges
- Appendix 4 EMC Information
- Appendix 5 FCC Information
- Appendix 6 Order List

i15 Blood Gas and Chemistry Analysis System User Manual Installation Guide
- 24 -
6. Shut the battery compartment cover and secure it with the screws.
Battery Removal
Remove the battery in reverse order. You can pull the strip at the end to take the battery out from
the compartment.
NOTE:
The battery needs to be charged prior to using it.
Only those batteries supplied by EDAN or its authorized distributors should be used
with the analyzer.
When the analyzer is powered by the battery and the battery is low, the system will
prompt you to connect the analyzer to an external power outlet. At the same time, the
battery indicator icon on the status bar at the bottom of the screen will also blink.
The battery will automatically be charged whenever the analyzer is connected to an
electrical outlet.
3.3.3 Installing the Printer Paper
The analyzer utilizes rolled thermal paper with the width of 50mm. When the printer paper runs
out during the printing or is not loaded, the warning message “Paper?” will appear on the screen.
Then you should load or replace the printer paper immediately.
Procedures for Loading Rolled Thermal Paper
1. Open the casing.
2. Gently place the paper in the paper tray with the outside of the paper facing the thermal print
head.
3. Pull about 2 cm of paper out and shut the printer casing.