
User's Manual

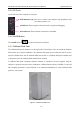

Table Of Contents
- About this Manual
- Statement
- Responsibility of the Manufacturer
- Terms Used in this Manual
- Table of Contents
- Chapter 1 Safety Guide
- Chapter 2 System Overview
- Chapter 3 Installation Guide
- Chapter 4 Setup
- Chapter 5 Patient Analyzing
- Chapter 6 Quality Control (QC) Tests
- Chapter 7 Data Management
- Chapter 8 Online Update
- Chapter 9 Troubleshooting
- Chapter 10 Cleaning, Care and Maintenance
- Chapter 11 Theory
- Chapter 12 Parameters
- Chapter 13 Warranty and Service
- Appendix 1 Specifications
- Appendix 2 Measurement Ranges
- Appendix 3 Reference Ranges
- Appendix 4 EMC Information
- Appendix 5 FCC Information
- Appendix 6 Order List

i15 Blood Gas and Chemistry Analysis System User Manual Installation Guide
- 22 -
3.2.2 Power Requirements
The analyzer needs to be connected to a grounded electrical outlet with the voltage between
100±10% VAC - 240±10% VAC and the frequency of 50/60Hz.
3.3 Setting Up
Now you can prepare your analyzer for operation.
First, please place the analyzer on a secure table surface with environments that meet the
requirements as described in section 3.2.
3.3.1 Connecting to AC Power
1. Insert the power adaptor into the power connector on the analyzer.
2. Plug the power cord into the power adaptor.
3. Plug the power cord into a grounded electrical outlet.
NOTE:
Make sure the power requirements as described in 3.2.2 are met.
To avoid the analyzer and other electronic devices being damaged by electrical power
spikes, a surge protector is recommended.
3.3.2 Installing the Battery
Switch off the analyzer and unplug it before installing or removing the battery.
WARNING
If the analyzer is powered by a rechargeable lithium battery, please install the battery first.
Battery Installation
Follow the steps below to install the battery:
1. Turn off the analyzer, disconnect the power supply, and remove the power adaptor and other
connecting cables.
2. Place the analyzer upside down on a flat surface covered with cloth or another type of
protecting pad.
3. Remove the screws of the battery compartment using a cross-head screw driver, and then