
User's Manual

Acclarix AX8 Diagnostic Ultrasound System User Manual Features
- 59 -
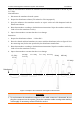
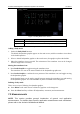
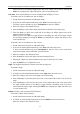
Adding comments using pre-defined comments
1. Invoke the Comment function
2. Move the cursor to the desired location and press the desired pre-defined comment.
Some of the pre-defined comments may be grouped together with a border surrounding them
(such as „Rt‟ and „Lt‟ in figure 7.1). These are special keys that let you quickly replace one
term with another, regardless of where the cursor is within a block of text. For example, if
you had entered “Rt. Kidney” as a block of text, pressing the “Lt.” button would change that
block to “Lt. Kidney” even if the cursor is not at the specific location.
Adding arrows
1. Invoke the Comment function
2. Press Arrow button on the touch screen to display an arrow at the current cursor location.
3. Move the arrow to the desired location. Note that while the arrow is being moved the
orientation of the arrow is fixed.
4. Press the Pos/Angle button to set the tip of the arrow in its current location and toggle
adjusting the angle of the arrow. The trackpad can now be used to rotate the arrow. The
Pos/Angle button can be used to toggle between moving the head of the arrow and moving
the tail of the arrow. The selected button is yellow colorized in the background.
5. Press the Enter button to complete the arrow. You can now enter text at the end of the arrow.
Modifying comments
1. Move the cursor to a desired comment, notice that an insert cursor appears in the text as the
cursor moves over an existing block of text.
Enter text using either the keyboard or pre-defined comments. The new comments will be
added to the old text.
Deleting comments
There are several ways to delete comments:
Move the cursor to the desired block of comments and press the Delete button on the touch
screen to delete that block of comments.
Press the Delete All button on the touch screen to remove all comments.
Press the Clear hard key on the console to remove all comments, bodymarkers, and
measurements.
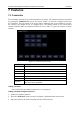
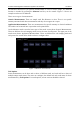
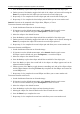
7.2 Body Mark
The Body Mark lets you add a bodymarker graphic to an image and indicate the location of the
transducer using a transducer icon on that graphic. The Body Mark function is invoked by
pressing the Body Mark hard key on the console. Figure 7.2 shows an example touch screen for
Body Mark. The main portion of the screen shows a grid of bodymarkers that are pre-defined in
pre-sets. See section 8 for details on how to configure these. The bottom portion of the screen
shows controls available while the Comment function is active. Table 7-2 gives an overview of
these controls.