
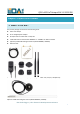
Installation Instructions
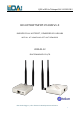


QSG of ED-IoTHotspot-Pi4 V1.20220112
EDA Technology Co.,LTD– Electronics Development Accelerator
8
2.2 Prepare and Power up your Hotspot
1. Carefully screw in the provided Wi-Fi/BT antenna and LoRa antenna
2. Find a suitable location for your Gateway (for optimal coverage we recommend placing the unit near a
window and close to a power source).
3. If you are using ethernet connection, locate the ethernet port on the back of your gateway and securely
insert ethernet cable.
4. Power the gateway with the included power adapter.
5. Allow the unit a few seconds to power on. The status light should be WHITE indicates that it's powered up
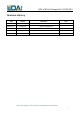
2.3 Understand the Status Light
The status light on the front of the hotspot can help you to verify various conditions:
Color
Indicator
State
Description
WHITE
Powered-up
Once the hotspot is powered up, the LED will go WHITE to indicate the
system is booting up
GREEN
Connected to
P2P network
GREEN indicates the hotspot is connected to Helium network. You should
always in this state to miner HNT
BLUE
Bluetooth
Mode
Once you push the button on the front of the hotspot about 10 seconds,
The hotspot will enter Bluetooth mode to allow you Andoird / iOS phone
to connect to the hotspot
YELLOW
Disconnected
from P2P
network
YELLOW indicates the hotspot is disconnected from the P2P network.
Please check you network settings or login to the Dashboard for more
information
PURPLE
OTA
PURPLE indicates a new OTA is available and the hotspot is installing it
RED
Error
RED indicates some errors occurs, maybe an OTA failed and miner
software run into issues. Please login into the Dashboard for more
information or perform a reset