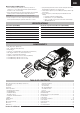
® 1/10 2WD ELECTRIC MONSTER TRUCK ECX03048T1/T2 ECX03048IT1/T2 INSTRUCTION MANUAL BEDIENUNGSANLEITUNG MANUEL D’UTILISATION MANUALE DI ISTRUZIONI Congratulations on your purchase of the ECX® Amp Crush™. This 1/10-scale model introduces you to the sport of RC driving. Herzlichen Glückwunsch zum Kauf des ECX Amp Crush. Dieses 1/10 Scale Model öffnet Ihnen die Welt des RC Car Sports. Nous vous félicitons pour l’achat de l’ECX Amp Crush. Ce modèle 1/10 vous initie à la conduite RC.
EN NOTICE All instructions, warranties and other collateral documents are subject to change at the sole discretion of Horizon Hobby, LLC. For up-to-date product literature, visit http://www.horizonhobby.com and click on the support tab for this product.
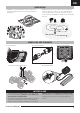
EN Wet Conditions Maintenance • Remove the battery pack(s) and dry the contacts. If you have an air compressor or a can of compressed air, blow out any water that may be inside the recessed connector housing. • Remove the tires/wheels from the vehicle and gently rinse the mud and dirt off with a garden hose. Avoid rinsing the bearings and transmission. NOTICE: Never use a pressure washer to clean your vehicle.
EN QUICK START Please read the entire manual to gain a full understanding of the vehicle, fine-tuning the setup and performing maintenance. 1. Read the safety precautions found in this manual. 2. Charge a battery for the vehicle. Refer to the included charging warnings and instructions for battery charging information. 3. Install the AA batteries in the transmitter. Only use alkaline or rechargeable batteries. 4. Install the fully charged battery in the vehicle. 5.
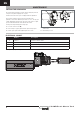
EN TRANSMITTER CONTROLS REVERSE SWITCH BATTERY LEVEL INDICATOR Solid Red: Battery voltage is good (above 4V). Allows you to change the direction of steering (ST. REV) and throttle (TH. REV) controls (Ensure proper function with a radio system test). Blinking Red: Battery voltage is critically low (below 4V). Replace transmitter batteries.
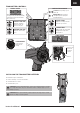
EN BINDING The included transmitter and receiver are bound at the factory. If you need to rebind, follow the instructions below. 1. Power ON the receiver. The receiver LED flashes slowly. 2. Insert the bind plug into the receiver’s binding pins. The receiver LED flashes rapidly. 3. Power ON the transmitter. 4. The receiver LED turns solid when binding is successful. Remove the bind plug. You must rebind when binding the receiver to a different transmitter.
EN OPERATION • ALWAYS turn on your transmitter before you turn on the receiver in the vehicle. Always power off the receiver before turning your transmitter off. • ALWAYS operate your vehicle in a wide open area. Operating the vehicle in a small space or indoors can cause overheating at low speeds. Operating at low speed increases heat in the electronic speed control (ESC). Overheating can damage the vehicle and failure may result. WHEN YOU ARE FINISHED 1. Power off the ESC. 2. Disconnect the battery.
EN MAINTENANCE SETTING THE GEAR MESH B The gear mesh has already been set at the factory. Setting the gear mesh is only necessary when changing motors or gears. C You must remove the vehicle’s gear cover (A) to make this adjustment. Proper gear mesh (how the gear teeth meet) is important to the performance of the vehicle. When the gear mesh is too loose, the spur gear could be damaged by the pinion gear of the motor. If the mesh is too tight, speed could be limited and the motor and ESC will overheat.
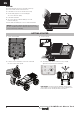
EN SHOCK ABSORBER PARTS SHOCK CLEANING REAR Oil-filled shocks require regular maintenance because the oil breaks down or gets dirty. Perform this maintenance after every 3–5 hours of use, depending on the conditions. FRONT ECX1037 ECX1037 ECX1043 ECX1057 • Remove the shock from the vehicle. • Remove the cap from the shock body and dispose of fluid. • Disassemble the shock. Clean thoroughly with a plastic- and electronicsafe degreaser (DYNE50001). Dry parts before assembly.
EN TROUBLESHOOTING GUIDE Problem Short run time Sluggish action Controls reversed Motor/ESC overheat Does not operate Poor range The system will not connect The receiver goes into failsafe mode a short distance away from the transmitter The receiver quits responding during operation Receiver and transmitter are not bound Vehicle moves forward or backward without input from user Car does not drive straight No steering or lack of steering No throttle or lack of throttle Clicking noise in transmission
EN LIMITED WARRANTY What this Warranty Covers Horizon Hobby, LLC, (Horizon) warrants to the original purchaser that the product purchased (the “Product”) will be free from defects in materials and workmanship at the date of purchase. that you may need any assistance. For questions or assistance, please visit our website at www.horizonhobby.
EN WARRANTY AND SERVICE CONTACT INFORMATION Country of Purchase United States of America Horizon Hobby Contact Information Horizon Service Center (Repairs and Repair Requests) servicecenter.horizonhobby.com/ RequestForm/ Horizon Product Support (Product Technical Assistance) productsupport@horizonhobby.com 2904 Research Road Champaign, Illinois, 61822 USA websales@horizonhobby.com Sales European Union 877-504-0233 Address 800-338-4639 Horizon Technischer Service service@horizonhobby.
PARTS DIAGRAM | EXPLOSIONSZEICHNUNG | VUE ÉCLATÉE DES PIÈCES | ESPLOSO DEL MODELLO CON REFERENZA PEZZI RECOMMENDED ITEMS EMPFOHLENE WERKZEUGE OUTILS RECOMMANDÉS ATTREZZI CONSIGLIATI 9 M3x12 11 3 M3x10 M3x10 11 2 mm 1.
PARTS DIAGRAM | EXPLOSIONSZEICHNUNG | VUE ÉCLATÉE DES PIÈCES | ESPLOSO DEL MODELLO CON REFERENZA PEZZI The slipper clutch can be adjusted using this locknut (ECX1060). Fully tighten the locknut, then loosen the nut two full turns. Die Rutschkupplung kann durch diese Stopmutter eingestellt werden (ECX1060). Ziehen Sie die Mutter an und drehen Sie dann volle zwei Umdrehungen zurück. Il est possible d’ajuster le sliper par action sur cet écrou de blocage (ECX1060). Veillez à serrer l’écrou de blocage à fond.
PARTS DIAGRAM | EXPLOSIONSZEICHNUNG | VUE ÉCLATÉE DES PIÈCES | ESPLOSO DEL MODELLO CON REFERENZA PEZZI 43 51 48
REPLACEMENT PARTS | ERSATZTEILE | PIÈCES DE RECHANGE | PEZZI DI RICAMBIO Part # Description Beschreibung Description Descrizione 1 ECX231022 Short Chassis Chassis Châssis principal Telaio principale 2 ECX1028 Servo Saver Set Servo Saver Set Sauve servo Set salvaservo 3 ECX2011 Cover and Rear Mount Set Abdeckung und hinterer Halter Set Capot et fixations arrières Copertura e set di montaggio posteriore 4 ECX1050 Setscrew M3 x 12 (4) Schrauben Set M3 x 12 (4) Jeu de vis M3 x 12 (4)
REPLACEMENT PARTS | ERSATZTEILE | PIÈCES DE RECHANGE | PEZZI DI RICAMBIO Part # Description Beschreibung Description 3 × 6 × 2.
® ECX03048T1/T2 ECX03048IT1/T2 www.ecxrc.com © 2019 Horizon Hobby, LLC. ECX, the ECX logo, Amp Crush, Dynamite, Speedpack, Powerstage, EC3 and the Horizon Hobby logo are trademarks or registered trademarks of Horizon Hobby, LLC. The Spektrum trademark is used with permission of Bachmann Industries, Inc.