
Instruction manual


53
boost
41
34
34
34
34
34
14
43
12
30
12
10
3
43
17
31
31
19
29
24
29
20
26
26
28
27
27
23
19
14
15
22
21
37
3340
14
3314
42
32 32
22
35
35
35 14
14
36
25
38 35 33
33
33
35
39
35
33
33 33 38
25
36
36
39
5
33
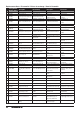
M2.5X4 M2.5X8
M2.5X8
M3X3
M3X18
M3X12
M3X12
M2X16
M2X16
M3X16
M3X12
M3X20
M3X18
M3X12
M2.5X4
M2.5X4
M3X12
M3X12
M3X12
M3X12
M3X16
M3X13
M3X12
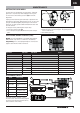
When installing the wheel, make sure the drive hex is aligned with the drive pin. When the drive
hex is removed, the drive pin can fall out of the axle.
Bitte achten Sie bei der Radmontage darauf, dass die Radachse im Radmitnehmer sitzt und dass der
der Querstift nicht heraus fällt.
Lors de l’installation de la roue, assurez-vous que l'hexagone de roue est aligné avec la goupille
d'entraînement. En cas de démontage de l'hexagone, la goupille peut sortir de l'axe et tomber.
Quando montate le ruote, accertatevi che il trascinatore esagonale sia allineato con la spina del
mozzo ruota. Quando togliete il trascinatore esagonale la spina può sfi larsi dal mozzo.
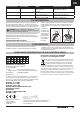
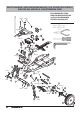
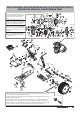
PARTS DIAGRAM | EXPLOSIONSZEICHNUNG | VUE ÉCLATÉE DES PIÈCES |
ESPLOSO DEL MODELLO CON REFERENZA PEZZI
The slipper clutch can be adjusted using
this locknut (ECX1060). Fully tighten the
locknut, then loosen the nut two full
turns.
Die Rutschkupplung kann durch diese
Stopmutter eingestellt werden (ECX1060).
Ziehen Sie die Mutter an und drehen Sie
dann volle zwei Umdrehungen zurück.
Il est possible d’ajuster le sliper par ac-
tion sur cet écrou de blocage (ECX1060).
Veillez à serrer l’écrou de blocage à fond.
Ensuite, devissez l’écrou de trois tours
complets.
La frizione può essere regolata con
questo dado autobloccante (ECX1060).
Prima avvitate completamente il dado,
poi svitatelo 2 giri.