
User Manual


7
EN
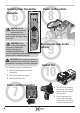
Video Transmitter
(VTX) Button
NOTICE:
If you are operating this product in North
America, you are required to have an Amateur Radio
(HAM) license. Visit www.arrl.org for more information.
TIP:
North American customers may purchase
BLH8517 as an upgrade which will offer more
channels available in that region.
NOTICE:
FS CH8 is received on FS CH7.
Raceband CH 1 and CH2 are received on
Raceband CH3, and Raceband CH7 and CH8 are
received on Raceband CH6
Video Transmitter LEDs
Channel
Band
Available Frequencies (mHz)
Band CH 1 CH 2 CH 3 CH 4 CH 5 CH 6 CH 7 CH 8
Band A 5865 5845 5825 5805 5785 5765 5745 5745
Band B 5733 5752 5771 5790 5809 5828 5847 5866
FS/IRC 5740 5760 5780 5800 5820 5840 5860 5860
RaceBand 5732 5732 5732 5769 5806 5843 5843 5843
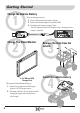
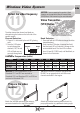
Wireless Video System
11
12
Attach the included antenna to the antenna
connector located on the top of the monitor.
Attach the included monitor stand and use it to
prop up the monitor to a preferred viewing angle.
Select the video frequency
Prepare the video
monitor
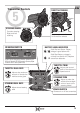
The video transmitter channel and band are
changed using the button on the left side of the
camera module.
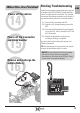
Channel Selection:
1. Channel 1 is indicated by the red LED glowing
solid.
2. Press the VTX button
to cycle through the
channels (1-8). The red
LED will flash once as
you cycle through each
channel.
Band Selection:
1. Press and hold the VTX button to change the video
transmitter band.
2. Each time the VTX button is pressed and held
the blue band LED will indicate a change to the
next available band. The blue LEDs indicate
band A, band B, FS/IRC band, and RaceBand, as
shown in the illustration.
Shown with tire removed for clarity.