Item #1009 513 064 Model #LR411U-2.
Table of Contents ................................... 2 Safety Information ................................. 2 Warranty ................................................3 Pre-Installation ......................................4 Installation ........................................5 Operation ..........................................8 Care and Cleaning .............................11 Battery Safety ....................................
Warranty The manufacturer warrants this fixture to be free from defects in materials and workmanship for a period of two (2) years from date of purchase. This warranty applies only to the original consumer purchaser and only to products used in normal use and service.
Contact the Customer Service Team at 1-800-910-7164 or visit www.HomeDepot.com/EcoSmart.
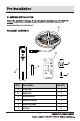
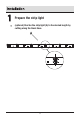
Prepare the strip light (optional) Shorten the strip light (A) to the desired length by cutting along the black lines.
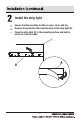
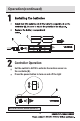
Install the strip light Ensure that the mounting location is even, clean, and dry. Remove the protective film from the back of the strip light (A). Press the strip light (A) to the mounting surface and hold in place for a few seconds.
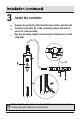
3 Install the controller Remove the protective film from the back of the controller (B). Press the controller (B) to the mounting surface and hold in place for a few seconds. Use the mounting clips(E) and screws(F) to further secure the strip light.
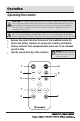
Operating the remote CAUTION: The remote control included utilizes a 3V CR2025 battery; Do not dispose of batteries in fire as they may explode or leak. Please dispose of used batteries immediately and safely. Only replace with the same battery type. Examine devices and make sure the battery compartment is correctly secured, e.g. that the screw or other mechanical fastener is tightened. Do not use if compartment is not secure.
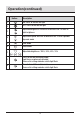
Operation(continued) Button Description 1 ON: Press to turn on the light 2 OFF: Press to turn off the light 3 Adjustable brightness: Increase or decrease the 10-level of light brightness 4 Adjustable speed: Increase or decrease the 10-level speed of dynamic mode 5 Fade mode 6 Flash mode 7 Adjustable brightness: 100%, 50%, 25%, 10% 8 9 Press to turn on the motion mode Light turns on when get detected Successful setting reminder: white light flash Pressto turn off the motion mode Successful s
Operation(continued) Controller Operation Set the switch to AUTO to activate the motion sensor on the controller(B). Press the power button to turn on and off the light NOTICE: Detects motion up to 6.
Use a soft, dry cloth to clean the strip light. Do not use alcohol-based cleaners, as this may damage the light surface.