
User Start Guide
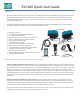

Mechanical Installation:
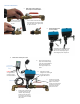
1. With a slight stretch, tightly wrap
Silicon tape around valve shoulder:
Use one hand to hold the start of the
tape against the valve shoulder while
using your other hand to tightly wrap
the tap around itself
The tape does not stick
to the valve but sticks
to itself
2. Attach mounting bracket
to motor assembly:
Slide/push the HCx mounting bracket
over the motor assembly tab. Insert
M6 screw and adjust finger tight to
allow left/right position adjustment
3. Mount motor assembly on to valve:
Caution: Be sure pins
are aligned before
pushing connector
into Control Module
A. Position motor assembly with
mounting bracket over valve
shoulder. Adjust mounting
position so that pivot points
are centered, even and level.
Tighten clamp to fix assembly
into position.
B. Slide motor assembly
left/right over mounting tab
to center pivot points.
Tighten M6 tab screw.
C. Position lever pins tight
against valve handle and
tighten screw/nut into
position. Test power stroke
and adjust pin position as
required for complete
open/close of valve.
D. Plug-in motor connector (6
pin) to Control Module. Plug-
in DC jack to Control Module.
Mount Control Module to
wall. Plug-in Adapter to AC
power.
Power Stroke
Pairing/Inclusion
button
M6 Screw