US EX-HANDY 05.indd 1 Ex-Handy 05 Bedienungsanleitung Operating Instructions Notice d‘utilisation Gebruiksaanwijzing Istruzioni per l‘uso Instrucciones de uso Manual de instruçoes Bruksanvisning 01.10.
US EX-HANDY 05.indd 2 Deutsch Seite 1 English Page 38 Français Page 71 Nederlands Pagina 105 Italiano Page Español Página 175 Português Página 209 Svenska Sida 140 243 01.10.
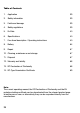
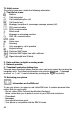
Table of Contents 1. Application 39 2. Safety information 39 3. Faults and damage 39 4. Safety regulations 39 5. Ex-Data 40 6. Specifications 40 7. Functional description / Operating instructions 40 8. Battery 64 9. Repair 67 10. Cleaning, maintenance and storage 67 11. Disposal 67 12 . Warranty and liability 68 13 . EC Declaration of Conformity 68 14 .
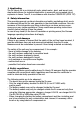
1. Application The Ex-Handy 05 is an intrinsically safe, splash water-, dust- and impact-resistant mobile phone for industrial application in areas with an increased risk of explosion in zones 1 and 2, in accordance with directive 1999/92/EC (ATEX 137). 2. Safety information This operating manual contains information and safety regulations which are to be observed without fail for safe operation in the described conditions.
- The covers for the SIM card and charging socket must be closed in the Ex-area. - When replacing the battery cover it must be ensured that the cover locks in place properly and that the rear is secured using the six screws. - It must be ensured that the phone is not taken into zone 0 or 20, 21 or 22! - Only accessories approved by ecom instruments GmbH may be used.
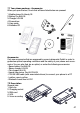
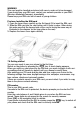
7.1 Your phone package - Accessories When you open the box, check that all items listed below are present: 1. Mobile phone Ex-Handy 05 2. Battery Ex-AMH 05 3. Charger LGH 05 4. Screwdriver 5. User guide 6. Software-CD è é å ê ç ë Accessories Only use accessories that are approved by ecom instruments GmbH in order to guarantee optimal operating conditions and the safety of your phone and accessories.
Hold down: Switch on/off. In a call context: Reject a call - hang up In menus: Return to initial screen Long press: Activate/Deactivate hands-free mode (Warning: In this mode do not bring the phone up to your ear.) (This could cause damage to your hearing).
Hold down: In initial screen: Silent mode In call reception mode: Short press stops ring tone In ring tone setting mode: Activate/deactivate ring tone Zoom mode (see Multimedia and WAP menus) 2 to 9 A long press on the keys 2 to 9 directly displays the phonebook. 7.3 Navigation principles These basic principles bring a great intuitiveness to your phone. Validate by pressing the key or the navigation stick. will take you to the previous level.
7.
WARNING This card must be handled and stored with care in order not to be damaged. If you should lose your SIM-card, contact your network provider or your SMC (Services Marketing Company) immediately. Please keep your SIM-card out of reach of young children. First use: Installing the SIM-card 1. Open the lower cover carefully on the Ex-Handy 05 to insert the SIM card. 2. Slide the SIM-card into the card holder until it locks in place.
WARNING If a wrong PIN number is entered three times in succession, your SIM-card is blocked. You must then: - Enter „**05*“. - Enter the PUK (Personal Unblocking Key) code provided by your operator and validate. - Enter your PIN number and validate. - Enter your PIN number again and validate. After 5 or 10 failed attempts (depending on the type of SIM-card), the SIM-card is definitely locked. You must then contact your operator or your SMC to obtain a new card. 7.6.
Calling voicemail In the initial screen, press and hold down the 1 key. Receiving a call When you receive a call, the number of your correspondent is displayed when it key or the key to answer and is presented by the network. Press the key or the key. speak. To refuse the call, press the Emergency services Depending on the operators you can obtain the emergency service with or without SIM-card or when the keypad is locked. It is enough to be in an area served by the corresponding network.
7.8 Phonebook Using the phonebook Enter the Phonebook menu. The contacts list is displayed if you set up contacts. When a contact is selected, an icon is displayed in the title bar: contact stored in the SIM card contact stored in the phone contact stored in the Fixed Dialling. See PIN2-Code and Fixed dialling in Security Menu for more details about this activation. You can search for a contact quickly by typing the first letters (up to three). You can display it by pressing [OK].
My numbers You can create the entries corresponding to your own numbers in order to consult them when necessary. Select My numbers and validate. Enter the different details and validate. Mailing lists A mailing list allows you to send a same message to several recipients at the same time. - Select Mailing Lists and press the navigation stick. The phone asks you to confirm the creation of a new list. - Select the list type (SMS or MMS) and press the navigation stick.
MMS are differently invoiced than SMS are. Please contact your network provider to get more information on their cost. Compose SMS On the Messages menu select the Compose menu and validate. Choose the SMS option. The language used is the one selected on the display of the phone. If the language selected is not compatible with the Easy Message T9™, the English language will be automatically selected.
When composing a message: - key Deletes last letter - key Message options - key (long press): Zoom mode (changes size of characters) - key (short press): Access to symbol table - key (long press): Upper case Compose MMS On the Messages menu select the Compose menu and validate. Choose the MMS option. [Options] is used to When the text has been entered in the Message field, access the functions offered. Saving the message Select Save. It is saved in the Drafts menu. Select Save as Template.
Messages are listed in chronological order, the latest one being displayed first. The quantity of Not Read and Not Retrieved messages is shown. Not Retrieved and Not Read messages are shown in bold. Outbox This menu displays the messages that have not been sent. You can send them again from this menu. Sentbox If you activated the Store sent messages option in the Options menu, the Sentbox menu is used to store all your sent messages. Too many messages saved will quickly fill up the available memory.
- MMS server: to select another MMS provider, or set the parameters of a new MMS provider. - Sender visibility: you choose to display or not your phone number on the receiver’s phone screen, with that message. Calling Voice Mail This function allows you to call your voicemail. On the Messages menu, choose the Call Voice Mail menu and [Select]. This number depends on the operator. 7.10 Multimedia My Pictures This menu gives you access to the pictures you have downloaded.
7.11 WAP The WAP Menu The WAP navigator is under licence: The WAP navigator and the software included are the exclusive property of Openwave. For this reason, it is forbidden to modify, translate, disassemble or even decompile all or part of the software. You can activate the magnifying glass to increase the size of the characters by key. holding down the The Services menu, a dropdown menu, can be accessed at all times when navikey.
Configuring WAP parameters Select the Advanced... menu and the Settings menu. Profiles is used to select or modify your access provider‘s logon parameters or configure the parameters of other access providers. (The active profile is preceded with a asterisk). Configuration of GSM and GPRS parameters: All information to be entered in the parameters are provided by your operator or service provider. On a profile in the list, press [Options] and select Modify.
Using the Welcome menu, you can log onto your service provider‘s WAP site key. If you are logging onto the GSM or GPRS network, the by pressing the @ symbol flashes. The metering of the cost of the call starts as soon as it stops flashing. WAP Logging off key. The logoff happens automatically after a few To log off, press the seconds of inactivity if you forget to log off. This period is defined by the Linger time setting. GPRS A flashing icon indicates that the phone is logging onto a GPRS network.
and see them. - Delete all: Enables you to delete all tasks in the ToDo list in a single step. - Memory: allows you to view the memory used by the different functions of your ToDo. - Synchronize: allows you to synchronise a ToDo with a computer. Data exchange with a PC Working from a PC, you can save/edit contacts, events and tasks stored in your phone. To do this, you will need to connect your phone to the PC by means of a suitable data cable.
- Delete: allows you to schedule the deletion of events that took place more than one day, week or month ago. - Memory: allows you to view the memory capacity used by the different functions of your agenda. - Delete all: allows you to delete all events. - Synchronize: allows you to synchronise an event with a computer. The other menus are: - See month: allows you to access events on a month-by-month basis. - See week: allows you to access events on a week-by-week basis.
then save it. Give it a name and validate. The new tone is saved in the list of ring tones and in Multimedia/My Sounds. 7.14.2 Display Skins On the Display menu, select Skins. Select the desired skin and validate. Wallpaper On the Display menu, select the Wallpaper menu and [OK]. Select the wallpaper and [View]. The picture appears in the background of the screen. Press [OK] to validate this choice, or [Back] to go back to your choice.
7.14.4 Contacts On the Settings menu, choose the Contacts menu and [Select]. - Filter: this menu allows you to select the way to sort contacts in the phonebook (by name or first name). - Contacts list: This menu allows you to select the filter applied on the contacts list display (SIM contacts, phone memory or both). 7.14.5 Calls The Calls menu allows you to manage all the calls functions (call forward, displaying numbers, call waiting, voicemail number, etc.).
Automatic redial On the Calls menu, select Automatic redial and [Select]. You can set the redial function to inactive, on request or systematic. If you choose On request , your phone will offer to redial your caller automatically if the number is busy. Blacklist The blacklist is used to limit failures on automatic calls (calls generated by the automatic redial function or by applications: data, fax for example). On the Calls menu, select the Blacklist menu and [Select].
PIN2 number You have a second PIN number to allow you to access certain functions*. Proceed as above in order to activate, deactivate or modify PIN 2 number of your phone. * These functions may or may not be available depending on your SIM-card. Phone code The phone code is requested and checked whenever the phone is switched on, even if a different SIM card is used. To activate or deactivate the phone code, select the Phone code menu and validate. Enter 0000 (the factory code, by default) and validate.
Cost (Operator-dependent service) This menu allows you to control the cost of your calls. On the Security menu select the Cost menu and validate. The Cost menu (*) lets you check the cost of the last call you made and of all the calls you made since you last deleted them. The Delete costs menu (*) lets you delete the cost of your last call and reset the cost counter. Enter your PIN2 code first.
Time zone On the Date / Time menu, select Time zone and [Select]. Choose the time of the country desired by calculating the time from the GMT time. Daylight savings On the Date / Time menu, select Daylight savings and [Select]. Select 1h, 2h Summer time or Winter time depending on the season, and validate. 7.15 Connectivity You can exchange with other devices (PC, mobile phones, personal assistants, printers, etc.) various data: pictures, sounds, photos, To Do tasks, organiser events, contacts, etc.
Removing the battery unit Proceed as follows to remove the rear cover (when replacing the battery): - Remove the 6 screws using the screwdriver provided. Then raise the battery module from the phone. - When changing the battery module the battery compartment and the circulating seal are to be examined for any contamination and cleaned, if necessary, with a brush or by using blasts of compressed air. - Insert the new battery module into the phone.
8.2 Charging the battery Your phone is supplied with power via a rechargeable battery. Before a new battery can be used for the first time it must have been charged for at least 4 hours. The full battery performance is only obtained after a few operating cycles. If the battery charge level decreases below the operating value, the phone will indicate this (the empty battery symbol flashes).
8.3 Safety information Damaged batteries and chargers should be removed from use and sent to ecom instruments GmbH for inspection. Attention: - Extreme temperatures can have an adverse effect on charging the battery module Ex-AMH 05. - Do not dispose of the battery module in a fire! - Do not short-circuit the battery module! 9. Repair The national regulations and guidelines for repairs vary from country to country.
12. Warranty and liability In accordance with our general terms and conditions ecom instruments GmbH provides a warranty for this product for a period of two years regarding its function and material under the specified and permitted operating and maintenance conditions. This excludes all parts that are subject to wear and tear (e.g. batteries). We provide a 6-month manufacturer‘s warranty especially for the supplied Ex-battery.
14.
70
Kommunikation Mobile Computing Portable Handlampen Mess- & Kalibriertechnik Communication Torches/Flashlights Mobile Computing Measuring & Calibration Copyright© 2007 ecom instruments GmbH. Der Inhalt dieses Dokuments darf ohne vorherige schriftliche Genehmigung durch die ecom instruments GmbH in keiner Form, weder ganz noch teilweise vervielfältigt, weitergegeben, verbreitet oder gespeichert werden. Der Inhalt dieses Dokuments wird so präsentiert, wie er aktuell vorliegt.