
User's Manual


Datum // date
10.07.2014
Teile-Nr. // part no.
300011
Dokument-Nr. Revision //
document no. revision
300011AL11E 07
Head Module Settings
User Manual
Seite/gesamt // page/total
9 / 25
Dokument erstellt // document created
SAS387 10.07.2014
Dokument geprüft // document checked
FIH091 10.07.2014
User Manual: Head Module Settings
● Ablageort: C:\Users\de0216\Documents\Quellcode\EcomService\user_manual_head_module_settings\300011AL11E07_user_manual_head_module_settings.docx
● template no.: 0730QV06A03 ● template created: HAO006 20.01.2011 ● template checked: BEA373 20.01.2011 ● location: ISO drive ●
Explanation of the settings for the #U|E – UNI900:
Setting
Description
COM Port
Serial port of the reader.
set EPC in front
Enable or disable that the EPC of a TAG should be put in front of
the read data.
add CR after each EPC
If more than one TAG is identified and this option is enabled, a
carriage return is inserted after each EPC of a TAG.
from block
Start block address to start reading a TAG.
data length
Length of data to read from a TAG.
timeout for reading (in seconds)
Timeout for reading a TAG (a value from 1 to 25 seconds is
allowed).
Output Data
Format of the output data (HEX or ASCII).
change high byte with low byte
Enable or disable the changing from high byte with low byte of the
output data.
Power adjustment
Power adjustment of the reader. A setting from 6 to 27 dB is
available.
Note:
If more than one TAG is identified, only the EPCs of the TAGs are output. In this case the option set
EPC in front has to be enabled. If this option is disabled, a sound is ringing out if more than one TAG is
identified and nothing will be output.
In the case that more than one TAG is identified, no data is read from the TAGs so the options from
block and data length have no effect in this situation.
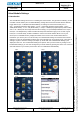
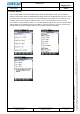
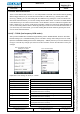
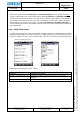
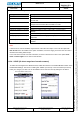
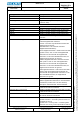
1.9 S# - SE955 (1D short range laser barcode scanner)
To make some changes for the SE955 scanner, enable the scanner in the “Enable Module” section in the
Head Module Settings. Then click on “Setting S# – SE955” (see Pic14). In the next window (see Pic15)
make your changes you want to do for the SE955 scanner and save them by clicking the OK button.
Pic14: Head Module Settings after
enabling the SE955 scanner Pic15: SE955 scanner settings