
User's Manual


4 MODEL XXXX FLAT PIR
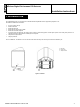
1. Push in the direction of the arrow shown in the drawing to
separate the detector from the bracket.
2. Mount the bracket on the wall.
3. Install new batteries.
-OR-
If batteries are already installed, pull the activation strip.
4. Mount the detector on the bracket by sliding it downward until
a click is heard.
Note: It is recommended to wait about 1 minute after battery removal, before inserting the new battery.
Caution! Risk of explosion if battery is replaced by an incorrect type. Dispose of used battery according to the manufacturer's instructions
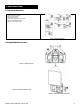
3.3 Replacing the Batteries
1. Press upward to separate the detector from the bracket.
2. Replace the batteries.
3. Put back the detector on the bracket.
Figure 7 – Replacing Batteries
3.4 Activating and Pairing the Detector
To pair the detector to the Touchscreen (control panel), you must set it to pairing mode.
1. First set the Touchscreen (panel) to pairing mode and then the detector.
2. To activate, pull the activation strip that protrudes from the back of the detector (see Figure 5).
3. The green LED (see Figure 1) blinks 3 times every 5 seconds (repeated up to 20 times) to indicate that the detector is searching for the
Touchscreen (control panel).
Note: If detector pairing is not successful during the searching process – by pressing the tamper switch – the searching process will restart.
4. Complete the pairing procedure on the Touchscreen (control panel) (see the pairing instructions in the Touchscreen / control panel’s installation
guide).
Note: Pairing should be performed before installation.
(Detector installation will have a good link with panel, if RSSI indicated on the Panel higher than -70BM and LQI stronger than 250. If values of
RSSI and LQI are lower, change Detector placement)
3.5 Rebooting the Detector
You can reboot the detector, as follows.
1. Remove the battery cover.
2. Remove BOTH batteries for 5 seconds
3. Re-insert both batteries
4. Close the battery cover.