
User's Manual


Factory Default
The FireFighter™ can be restored back to factory default settings which will remove its Z-Wave node ID from the sensor
(but not the controller) with the following steps.
A) Put the battery into the sensor.
B) Do not press the tamper switch.
C) Hold the learn button down for 10 seconds until the LED turns RED.
D) Release the learn button and wait for the sensor’s green LED to “breath” on and off continuously. The sensor is now
ready to be added to a Z-Wave network, and all settings have been restored.
TESTING (see IMAGE: 1)
To test the RF transmission from the mounted position you can either generate a tamper by removing the cover. This
will send a signal to the control panel. To test the audio detection, press and hold the smoke detector’s test button.
Ensure the FireFighter™ cover is on and that you wear hearing protection.
NOTE: This system must be checked by a qualified technician at least once every three (3) years. Please test the unit once
per week to ensure proper functionality.
Co Alarm Detection
In addition to Smoke Alarm detection, the FireFighter™ can detect the presence of a carbon monoxide alarm. By
default, the sensor is configured to not be guaranteed to detect a CO alarm, but can be configured to more reliably
catch a CO alarm in exchange for halving the battery life. This mode is activated or disabled upon powerup by holding
both the tamper switch and learn button while inserting the battery. The LED on power up blinks red and green to
indicate whether or not more reliable CO alarm detection is activated. The current mode is written to non-volatile
memory, and will therefore persist on replacing the battery.
RED + GREEN = CO not reliably detected, and battery will last twice as long.
RED + RED + GREEN = CO is more reliably detected, and battery will last half as long.
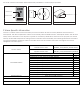
LED
The Firefighter™ is equipped with a multi-color LED. When a valid audio signal is heard the LED will turn yellow and
flash in sequence to the smoke detector sounder. When the Firefighter™ has determined the audio signal heard is
a valid alarm, the LED will turn red to indicate it has transmitted to the panel. It will also turn red when the case is
opened to indicate a tamper transmission to the control panel. On power up the LED will also flash red then green
as part of its power up cycle.
Insert Battery = One RED blink, then one GREEN blink
In frequency sound detected = Flash YELLOW for the duration of that sound
Fire Alarm detected = Solid RED for 3 seconds, then blink RED when tone detected
Tamper = Solid RED until tamper condition removed
Learn button pressed = Solid GREEN for 3 seconds
REPLACING THE BATTERY
When the battery is low a low battery notification will be sent to the life line nodes. To replace the battery:
1. Remove the top cover to reveal the battery. This will send a tamper signal to the lifeline nodes.
2. Replace with a Panasonic CR123A battery ensuring the + side of the battery faces as indicated on the device.
3. Re-attach the cover, you should hear a click when the cover engages properly.
WARNING: While the audio detector monitors its own battery, it does not monitor the battery in the smoke
detectors. Batteries should be changed as per the original smoke detector manufacturer’s instructions. Always test