
Installation Instructions


44
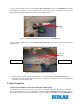
Figure 1. Bed Beacon Installation Location on the Bed
1. Installation
1.1 Step 1: Bed Mode Configuration
Install 2 Duracell Coppertop alkaline D cell batteries into the Bed Beacon. The Bed Beacon needs to be
configured to bed mode before installing the Bed Beacon onto the bed. To verify the Beacon’s mode, hold
both range buttons down. Immediately, the Beacon will alternate four (4) times between green and red
flashes. With each flash there will be an audio alert. Two (2) seconds later, the Bed Beacon should flash
green and beep once. The green flash and audio alert confirms that the Beacon is set for bed mode. If there
is one (1) red LED flash and one (1) beep, the Bed Beacon was already in bed mode and is now in stretcher
mode. Repeat the process to get the Bed Beacon back into bed mode.
1.2 Step 2: Installing the Bed Beacon (92053072)
The patient bed must be raised to a height of 32 inches from the floor to gain access to all of the mounting
locations.
Bed Beacon mounting
Mount the Bed Beacon directly centered underneath the bed with double-sided tape as shown in Figure 1.
Make sure the Bed Beacon and the mounting surface are clean and free of dirt and oil. A soft cloth
dampened with isopropyl alcohol works well to clean both surfaces.
1.3 Step 3: Installing the AC Line Power Sensor on the Bed’s AC Power Cord
The AC Line Power Sensor (see Figure 2) is mounted onto the bed’s gray AC power cord located
underneath the bed. Use the supplied cable ties to secure the AC Line Power Sensor to the bed’s power
cord as shown. The Bed Beacon field is only enabled when the Sensor detects AC power on the bed’s line
cord after it is plugged into an AC outlet. The Bed Beacon field will be disabled while the bed is unplugged.
The Bed Beacon will send heartbeats in both the enabled and disabled modes.
Bed
Beacon