
Installation Instructions


32
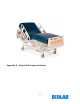
2. Route the AC Line Power Sensor cable underneath the bed along the metal rail frame. Secure the cable
with cable ties shown in Figure 4 & 5.
3. Place cable tie holders, route and tie down any excess cable from the AC Line Power Sensor as shown
(see Figure 5). After all cable management is complete, use small wire cutters to carefully flush cut off and
dispose of all cable tie ends.
3. Step 6: Final Test
3.1 Disconnect and Reconnect the Bed’s AC Power Cord
Confirm that the bed’s AC power cord is connected into a 120vAC power source. Disconnect the bed’s AC
power cord and within 5 seconds you will hear one beep and the Bed Beacon LED will flash red once.
Reconnect the bed’s AC power cord and within 5 seconds you will hear one beep and the Bed Beacon LED
will flash green once. This will confirm that everything is working properly. Complete the installation by
following the instructions on metadata entry in section 7 – Metadata Entry in the main section of this
document.
4. Bed Installation Checklist
Organize all required equipment & tools
1.
For installation adjust the bed mattress height to 32 inches
2.
For safetly reasons disconnect the bed AC power cord from
120vAC source
3.
Step 1
-
Bed
Beacon
Mode Configuration
4.
Step 2
-
Installing the Bed Beacon (
9205
3072
)
5.
Step 3
-
Install the AC Line Power Sensor (
9205
-
2186
)
6.
Step 4
-
Adjusting the Bed Beacon to Proper Field Range Refer to
section 6
7.
Step 5
-
AC Line Power
Sensor Cable Management
8.
Step 6
-
Final Test: Disconnect and Reconnect the Bed’s AC Power Cord
9.
Step 7
-
Metadata Entry
Figure 5.
AC Line Power Sensor
Cable Routing
Cable Ties