
Installation Instructions


14
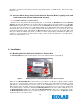
6. Adjusting the Patient Zone
6.1 Range Adjustment on Beds
The Bed Beacon communication range is adjusted during installation to optimize communication with the
healthcare worker Badge. To adjust the communication range, remove the rubber range cover (see Figure
11) located on the back of the Bed Beacon. After the range cover has been removed, the Bed Beacon
communication range is adjusted by repeatedly pushing either the “+” increment or the “–“ decrement range
buttons (see Figure 11) to achieve the desired range. The total adjustable range of the Bed Beacon is from
1 to 10 increments between the lowest and the highest setting. Each push of the “+” button will produce an
audible beep and the green LED will flash once indicating one (1) increment up. When the highest setting is
reached, two (2) audible beeps will be heard and two (2) green LED flashes will be visible. Each push of the
“-” button will produce an audible beep and the red LED will flash once indicating one (1) increment down.
When the lowest setting is reached, two (2) audible beeps will be heard and two (2) red LED flashes will be
visible. To reset a Bed Beacon’s range back to the factory default setting, push and hold both the “+” and
“-“ buttons at the same time. Three (3) audible beeps will be heard and the LEDs will simultaneously flash
green three (3) times. The factory default range setting for the Bed Beacon is position 10. Replace the
range button cover when the adjustment is complete.
Figure 11. Bed Beacon Range Adjustments
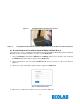
6.2 Test Badge Range Adjustment
1. Bed Installs - Adjust the bed and mattress height to the average height for beds in the facility.
Stretcher Installs - Adjust the stretcher and mattress height to the average height for stretchers in the
facility.
2. Bed Installs - While holding the Test Badge (without Network) 50 inches from the floor and 18 inches
from the bed’s handrail center location (side of bed) (see Figures 12 & 13), the Test Badge’s green and
yellow LEDs should flash once a second, indicating that the proper activation range and communication
have been successfully established. If range is not 18” adjust the Bed Beacon’s range buttons until the
Badge activation range is 18 inches (see Figure 12). Once the range has been set, use the Test Badge
(with Network) to verify the Bed Beacon communication to the Proprietary wireless network by
placing the Badge in the field.
Stretcher Installs - While holding the Test Badge (Network) 50 inches from the floor (Figure 12) and at
the edge of the stretcher handrail center location (side of stretcher), the Test Badge’s green and yellow
LEDs should flash once a second, indicating that the proper activation range and communication have
been successfully established. If range is not at the edge of the handrail adjust the Bed Beacon’s
range buttons until the Badge activation range is at the edge. Once the range has been set, use the
Test Badge (with Network) to verify the Bed Beacon communication to Network by placing the Badge
in the field.
In
crement “
+
“
Decrement “-”