
Installation Instructions


11
4.2 Bed Beacon Installation
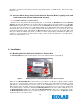
Remove the front battery cover, using a Phillips head screw driver. Correctly position battery polarity and
insert two new Duracell® Coppertop alkaline D cell batteries (see Figure 4). After the Bed Beacon batteries
are installed, the Bed Beacon will perform a POST (Power On Self-Test).
(a)***
- Three green LED flashes (Range Switch test). If only one green flash, + range switch is stuck closed
(pressed). If only two green flashes, - range switch is stuck closed (pressed).
(b) Pause
(c)**** - Alternate between green and red LED 2 times (LED test)
(d) BEEP - Piezo test
(Note: If the POST LED flashes red three times, then the Bed Beacon is defective.)
Replace the Bed Beacon’s battery door and re-tighten screw. Set the Bed Beacon in the desired
Bed/Stretcher Mode.
Figure 4. Installing Batteries
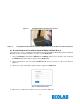
Figure 5. Version 1 Bed Beacon (9205-2185) Mounted on Patient Bed Model Hill-Rom Versa Care P3200
(Note: Photographs showing the mounting of the Bed Beacon on Hospital Beds will depict an earlier
version of the Bed Beacon, 9205-2185.)
Before attaching the Bed Beacon to the Mounting Bracket, position the Bed Beacon based on AC Line
Power Sensor cable management. Press the Bed Beacon (flat side) into the Bracket until a click is heard.
Pull downward on the Bed Beacon to verify that the attachment is secure.
To unclip the Beacon, push up on either Mounting Bracket tab to release (See Figure 6).
Figure 6. Mounting Bracket Release Tabs
Mount
ing
Bracket
Bed Beacon
Bed Beacon
Release
Tab
Bed Beacon Release Tab