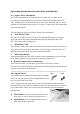
Eco 2 IN 1 STEAM MASTER User’s Manual Thank you for purchasing our product, please read this manual carefully before using this unit. Then, you can use it correctly Please keep this manual for future reference.
Safety Instructions Warning: Danger of scalding ● ● ● The steam cleaner must not be directed onto equipment containing electrical components, such as inside the oven. The steam cleaner must be unplugged after use and before the maintenance of the unit. If the power cord is damaged, it must be replaced by the manufacturer, its service agent, or a qualified person in order to avoid hazards. Warning ● ● ● ● ● Do not repair or change anything yourself in order to avoid fire and other accidents.
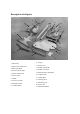
Description of all parts 20 4 3 5 6 7 16 19 17 1 14 2 11 13 10 8 9 18 21 15 12 1. Main body 2. Square floor attachment 3. Water tank knob 4. Power indicator light 5. Steam control knob 6. Power switch 7. Handle 8. Non-woven cloth 9. Microfibre cloth 10. Clothes brush 11. Scraper 12. Lemon acid 13. Round nylon brush 14. Round wire brush 15. Brush for floor attachment 16. Angled nozzle 17. Clothes plate 18. Cleaning stick 19. Measuring cup 20. Power cord 21.
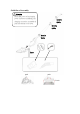
Guideline of Assembly Attention Please shut power off and unplug power cord before assembling and changing accessories. Assemble all parts after the unit cools down.
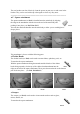
Operating instructions for each of the attachments: ● A. Square Floor Attachment This is the main attachment for using the unit as a steam mop. As shown on the previous page, install the handle to the end of the main body and align both arrows. Then, attach the square floor attachment at the base of the main body. This is securely attached once the button clicks into place. To remove it, simply press in this button and pull out the attachment.
The two brushes can also effectively clean the grease on pans, stoves and ovens in the kitchen. They can be used with soap or detergent to clean very dirty areas. ==================================================== ● C. Square attachment The square attachment (see Pic4) is installed onto the main body by aligning the ridge in the attachment with the slot on the end of the main body and pushing it into place.( see Pic5. Pic6.
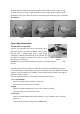
With the square attachment facing downwards and the blade from the scraper facing upwards, slot the top of the scraper attachment into the ridges at the end of the square attachment. Then, press down on the tab so the bottom part clicks into place. (see Pic13. Pic14.Pic15) Pic13 Pic14 Pic15 Operating instructions To add water to the unit: Unscrew the tank knob and use the measuring cup to add clean water to the tank (see Pic16).
Attention z The floor will be quite wet after use as the steam turns into water. z Do not spray steam directly onto glass and other fragile surfaces when these surfaces are cold. Use the low steam level from a distance first to let the surface preheat. Otherwise, it may damage the surface due to the rapid temperature increase. Care and Storage 1) Before cleaning this unit or changing accessories, press the power switch off and unplug the power cord.