
Installation guide


Eclipse RatioMatic v3.10 - Installation Guide No. 110, 7/1/03
26
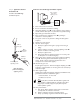
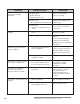
Step5: Verify Settings Setting verification:
Note:
There are no high fire gas adjustments or air adjustments when
firing into a neutral chamber. However, air and gas
pressures can be used to verify the burner system is
properly adjusted.
1. With burner lit, drive control motor to high fire.
2. Wait for the chamber to reach normal operating
conditions (e.g. chamber temperature, process flows, etc.).
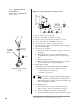
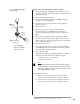
3. Measure high fire fuel differential pressure between tap (B)
and tap (D). Compare this to the “Fuel Orifice ∆P vs.
Input” graph on the data sheet.
4. Measure high fire air differential pressure between tap (C)
and the chamber. Compare this pressure to the “ Air ∆P vs.
Air Flow” graph on the data sheet.
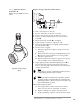
5. Drive the control motor to low fire and verify low fire
flame signal and flame appearance (if viewing).
Note:
Gas pressure at low fire will be too low to measure and
verify the fuel settings.
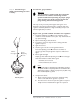
6. Cycle burner from high to low several times to check
repeatability of settings.
7. R
eadjust burner if the settings do not repeat as excepted. If
necessary, refer to Chapter 5, Maintenance & Troubleshooting.
8. Record all setup data as an aid for future troubleshooting
and setup operations.
Caution:
Do not turn the combustion air blower off until the chamber
temperature is below 250°F (121°C). This will prevent hot
gases from back flowing into the burner and blower causing
damage to the burner.
9. Stop the burner.
Tap B
Chamber
Tap C
Tap D