
Installation guide


Eclipse RatioMatic v3.10 - Installation Guide No. 110, 7/1/03
25
Bypass start gas with high turndown option:
1. Verify bias adjusting screw 1 on ratio regulator spring
column is six full clockwise turns (360° x 6) down from the
top (initial setting).
2. Open all manual shut off valves.
3.
Close internal bypass adjusting screw 2 by turning it
clockwise to closed position.
4. Set system control to stay at low fire during and after
ignition sequence.
5. Ignite the burner.
6. If burner goes out due to main gas flame failure:
Turn bias adjusting screw 1 a half turn clockwise to
increase gas flow. Repeat ignition sequence until burner
lights.
7. Slowly decrease gas flow with bias adjusting screw 1.
Decrease gas flow until the flame signal becomes erratic.
(Refer to flame monitoring relay literature for a description
of an erratic flame signal.)
8. If burner has gone out:
Repeat ignition sequence. Turn internal bypass adjusting
screw 2 a half turn counterclockwise to increase gas flow
at each attempt until burner lights.
9. Flame signal strength:
Adjust gas flow with internal bypass adjusting screw 2 for
lowest gas flow that maintains a stable flame signal:
• counterclockwise, for more fuel
• clockwise, for less fuel.
Note:
If viewing the flame, it should be blue with flashes of yellow.
The flame should be completely within the combustion tube.
When firing propane or butane, a proper low fire flame may
have sustained flashes of yellow.
10. Verify low fire flame.
a. Drive the control motor from low fire and back.
Verify low fire and stable flame signal are repeated.
b. Turn the burner off and repeat the ignition sequence.
Verify low fire and stable flame signal are repeated.
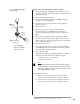
Step4: Set low fire gas
(continued)
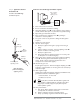
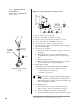
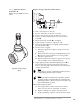
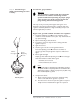
Bias
adjusting
screw
CCW for
more gas
CW for
more gas
Internal bypass
adjusting screw
Ratio Regulator
(with internal bypass
adjusting screw)
1
2