USER MANUAL MANUAL DE INSTRUCCIONES WPmSCREEN
USER MANUAL 1. IMPORTANT NOTE 1.1. Safety Precautions 04 04 2. INTRODUCTION 04 3. INSTALLATION AND CONNECTIONS 04 4. OPERATION 05 5. LOCAL CONFIGURATION OF THE UNIT 5.1. “Connect to…” Menu 5.2. “Screen Configuration” Menu 5.3. “Device Configuration” Menu 5.4. “Network Configuration” Menu 5.5. “Information / Tools” Menu 06 07 09 10 11 11 6. PART NAMES 13 7. SETUP DIAGRAM 14 8. TECHNICAL CHARACTERISTICS 27 All numbers subject to variation due to production tolerances. ECLER S.A.
1. IMPORTANT NOTE We appreciate your confidence in choosing our remote control panel WPmSCREEN. In order to obtain the best performance and efficiency it's VERY IMPORTANT to carefully read and follow all considerations specified in this manual before connecting the product. In order to guarantee the optimum operation of this unit, we strongly recommend that its maintenance be carried out by our Authorised Technical Services. 1.1.
4. OPERATION From EclerNet Manager application, you can create remote control panels for the system (UCPs) to manage one or more MIMO88, NXA, NZA or NPA units in a networked installation. Each panel can consist of one or more pages that include graphics, text, volume controls, buttons, VU meters, LED indicators, and so on.
5. LOCAL CONFIGURATION OF THE UNIT The WpmSCREEN has setting and configuration menus for a local access from the touch screen of the device. The same settings are remotely accessible when the screen is under the control of a remote computer running the EclerNet Manager application.
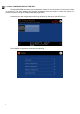
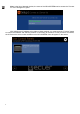
5.1. “Connect to…” Menu This menu allows you to set the UCP server the unit will connect to as a client. The UCP server may be a computer, another WPmSCREEN or even the same WPmSCREEN. In any case, the UCP server shall host an EclerNet Manager project that includes a series of UCPs which can be remotely managed by any UCP client.
Note: in the list of detected devices, the name of the WPmSCREEN used to access the "Connect to" menu will appear in green: After selecting an IP address using either of these methods, you must press the "Connect" button to confirm the selection and start the process of connecting to the server.
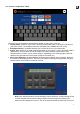
5.2. “Screen Configuration” Menu This menu lets you set different parameters for display on the screen of the unit: Display mode: behaviour of the screen dimming in sleep state, after 10 seconds of inactivity on your touch screen. The available modes are: ON (always lit), DIMMED and OFF (unlit) Backlight Intensity : brightness intensity of the screen when it is not in sleep mode Rotate 180º: allows you to rotate graphics displayed on the screen by 180º to physically install it upside down.
the layout of the controls (buttons, sliders, knobs, etc.) on each UCP during the design; the corners must be as free as possible. The icon bar displays new accesses to the horizontal scrolling between the pages of a panel (to the left and right), access to the home page of the unit ("HOME" icon) and exit of the icon bar ("X" icon): 5.3.
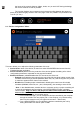
5.4. “Network Configuration” Menu This menu allows you to modify the network connection parameters of the WPmSCREEN: IP address, network mask, and gateway. Note: neither the WPmSCREEN nor any other EclerNet device supports the protocol of dynamic allocation of IP addresses (Dynamic Host Configuration Protocol or DHCP), so it's necessary to manually give them static addresses. 5.5.
This menu displays the name of the project the unit is connected to as a UCP client (project running on the UCP server of the client), as well as the memory used for user data in the unit, essentially the stored project data.
6. PART NAMES 1. Power jack 2. Ethernet port 3. VESA 75 mounting points 4. Magnets 5. Holes for securing to a surface 6. Holes for flush mounting 7. Touch Screen 7.
MANUAL DE INSTRUCCIONES 1. NOTA IMPORTANTE 1.1. Precauciones 16 16 2. INTRODUCCIÓN 16 3. INSTALACIÓN Y CONEXIONADO 16 4. FUNCIONAMIENTO 17 5. CONFIGURACIÓN LOCAL DE LA UNIDAD 5.1. Menú “Connect to…” 5.2. Menú “Screen Configuration” 5.3. Menú “Device Configuration” 5.4. Menú “Network Configuration” 5.5. Menú “Information / Tools” 18 19 21 22 23 24 6. LISTA DE FUNCIONES 26 7. DIAGRAMA DE FUNCIONES 26 8.
1. NOTA IMPORTANTE Agradecemos su confianza por haber elegido nuestro dispositivo de control remoto WPmSCREEN. Para conseguir su máxima operatividad y rendimiento es MUY IMPORTANTE antes de su conexión leer detenidamente y tener muy presentes las consideraciones que en este manual se especifican. Para garantizar el óptimo funcionamiento de este aparato recomendamos que su mantenimiento sea llevado a cabo por nuestros Servicios Técnicos autorizados. 1.1.
4. FUNCIONAMIENTO Desde la aplicación EclerNet Manager es posible crear paneles de control remoto del sistema (UCPs) que gestionen controles de una o varias unidades MIMO88, NXA, NZA o NPA en una instalación en red. Cada panel puede constar de una o más páginas que incluyan elementos gráficos, textos, controles de volumen, botones, vúmetros, indicadores LED, etc.
5. CONFIGURACIÓN LOCAL DE LA UNIDAD La unidad WPmSCREEN dispone de una serie de menús de ajuste y configuración para su acceso local, desde la propia pantalla táctil del dispositivo. Los mismos ajustes son accesibles de forma remota cuando la pantalla se halla bajo el control remoto de un ordenador y la aplicación EclerNet Manager.
5.1. Menú “Connect to…” Permite definir a que dispositivo servidor de paneles UCP se conectará la unidad para actuar como cliente. El dispositivo servidor de UCPs puede ser un ordenador, otra unidad WPmSCREEN o incluso la propia unidad WPmSCREEN. En cualquier caso el dispositivo servidor UCP deberá alojar un proyecto EclerNet Manager que incluya una serie de paneles UCPs, paneles que podrán ser manejados de forma remota por cualquier cliente UCP.
Nota: en la lista de dispositivos detectados, aparecerá con el nombre coloreado en verde el de la propia unidad WPmSCREEN desde la que se está accediendo al menú “Connect to”: Tras seleccionar una dirección IP mediante uno u otro método, es preciso pulsar sobre la tecla “Connect” para confirmar la selección e iniciar el proceso de conexión con el servidor.
5.2. Menú “Screen Configuration” Permite ajustar diferentes parámetros de visualización en la pantalla de la unidad: Display mode: comportamiento de la iluminación de la pantalla en estado de reposo, tras 10 segundos sin actuar sobre su superficie táctil.
Nota: incluso cuando las teclas estén deshabilitadas para su visualización, su función seguirá estando activa, de manera que al pulsar sobre las esquinas superiores activará el desplazamiento horizontal entre páginas de un panel y pulsar en las esquinas inferiores hará aparecer la barra de iconos. Este aspecto debe tenerse en cuenta en el momento de decidir la disposición de los controles (teclas, controles deslizantes, rotatorios, et.
instante, de manera que es preciso liberar primero los dispositivos bajo control por parte de un dispositivo, antes de intentar que sea otro quien los tome bajo su control: desde EclerNet Manager se pueden liberar los dispositivos controlados por el ordenador mediante la creación de un nuevo proyecto (File -> New Project), o bien desconectándolos de la red de uno en uno (botón derecho de ratón -> Disconnect) desde una unidad WpmSCREEN se pueden liberar los dispositivos controlados por dicha unidad con l
5.5. Menú “Information / Tools” Muestra el nombre del proyecto al que se encuentra conectada la unidad como cliente UCP (proyecto que corre en el servidor UCP del que es cliente), así como la memoria ocupada en la unidad por datos de usuario, en esencia los datos del proyecto alojado en la misma.
Reboot: reinicializa la unidad: Screen Calibration: calibración del sensor táctil de la pantalla: 25
6. LISTA DE FUNCIONES 1. Base de alimentación 2. Base Ethernet 3. Puntos de fijación VESA 75 4. Imanes 5. Taladros previos para fijación en superficie 6. Taladros previos para fijación empotrada 7. Pantalla táctil 7.
8. TECHNICAL CHARACTERISTICS 8. CARACTERÍSTICAS TÉCNICAS SCREEN Display technology Size Resolution Color Contrast ratio Touch panel Active area Backlight Viewing angle 6 o'clock direction Viewing angle 12 o'clock direction a-Si TFT active matrix 7" (diagonal) 800x480 24-bits RGB 500:1 4 wire Resistive. Can be operated with finger or stylus 154 x 86 mm. LED 70 degree 50 degree CONNECTIVITY Ethernet port Ethernet Base-Tx 10/100Mb Auto X-Over CAT5 up to 100m.
ECLER Laboratorio de electro-acústica S.A. Motors 166-168, 08038 Barcelona, Spain INTERNET http://www.ecler.com e-mail: info@ecler.es 50.0274.01.