
User Manual

WELCOME
Thank you for buying the Light Switch. The Light Switch allows you to control a light switch from the convenience of your receiver and TV.
Please follow these instructions to install your new Light Switch.
PACKAGE CONTENTS:
Light
Switch
Two-sided
Mounting Adhesive
Quick Start Guide
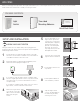
USING YOUR LIGHT SWITCH
SETUP AND INSTALLATION
5
4
If you want to leave the Light Switch on a table, make
sure the original light switch is in the on position. Follow
the instructions on your home automation receiver to
complete setup.
If you want to install the Light Switch over your current
light switch, continue with these instructions.
Line the back plate of the
Light Switch up with the
screw holes, ensuring the
that back plate is properly
positioned with the UP
printed on the back plate
facing up. For a rocker-
style light switch, trim the
back plate as needed.
6
Insert the two screws and
tighten with a screwdriver.
Snap the Light Switch
cover on the back plate on
the wall using the tabs,
ensuring it is secure.
9
2
Plug a light switch module (provided separately) into a
switched outlet and plug the lamp into it.
The Light Switch turns on and/or off any device plugged into a
switched outlet. The device must receive power from a separately
installed light switch module.
1
Decide whether you want the Light Switch on the wall
where the current switch is located or if you would like it
on a table somewhere else in the room.
3
Remove the Light Switch
cover. Press on the side
tabs to remove the back
plate from the Light
Switch.
7
Put the Light Switch in the
on position.
8
Pull the plastic tab that is
over the battery contacts.
LIGHT SWITCH
QUICK START GUIDE
ON