For very weak signals, change the position of the receiver, or elevate it, until radio signal lights turn on or at least flicker. You may have to use a long mini-stereo cable, or an extension, to place the receiver outside the vehicle. Always listen to the received signals, using a good-quality audio headset, to verify signal strength and to check for radio interference.
Good practice tips Accelerometers can be used for sensing leak noise in metallic pipes; however, hydrophones should be used for plastic and large-diameter pipes. Low-frequency vibration sensors may be used as an alternative to hydrophones. For metal pipes, attach sensors directly to the pipe. To ensure good coupling with the pipe, clean the pipe’s surface with a steel brush. If the pipe cannot be accessed directly, sensors can be attached to fire hydrants.
Good practice tips (continued) When sensors are attached to fittings on lateral connections, the length of lateral connections, up to the position where the sensor is attached, should be included in the total sensor-to-sensor distance. If the lengths of lateral connections at the two sensor positions are equal, they may be excluded from the total distance. In the latter case, the leak distance will be with respect to the point where the lateral connection branches off the pipe.
Good practice tips (continued) When using LeakfinderRT in pinpointing mode, measure the distance between the leak sensors accurately, e.g., using a frequently calibrated measuring wheel. Before excavating a leaking pipe, always confirm by listening with a ground mic the location of the leak position predicted by the correlator. Some computer brands have a power management tool which if ON may limit the soundcard operation to MONO mode to conserve power.
Suggested carry-on tools (not supplied) Work tools Safety Tools 9 Valve cover lifters 9 First aid box 9 Valve keys 9 Reflective safety vests 9 Meter box lid lifters 9 Traffic cones and barricades 9 Curb stop keys 9 Radio or cellular communication link 9 Fire hydrant keys 9 Pipe and service box locators 9 Modified fire hydrant caps with ¾ inch 14 NPT tap 9 Spray paint 9 Measuring wheel and tape 9 Teflon tape 9 Pressure gauge 9 Plastic buckets Page 18 27
9 Electrical connector cleaner 28
29
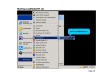
Starting LeakfinderRT (2) 30 Page 20
Starting LeakfinderRT (3) 31 Page 21
Selecting Line-in port as recording source (1) 32 Page 22
Selecting Line-in port as recording source (2) 33 Page 23
Selecting Line-in port as recording source (3) 34 Page 24
Selecting Line-in port as recording source (4) 35 Page 25
Selecting Line-in port as recording source (5) 36 Page 26
Selecting Line-in port as recording source (6) 37 Page 27
Preview of leak sound level (Preview command) 38 Page 28
Preview of leak sound level (Ajusting volume level) 39 Page 29
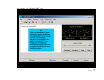
Correlating leak noise (Correlate command) 40 Page 30
Correlating leak noise (Input parameters form) 41 Page 31
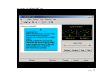
Correlating leak noise (Input parameters: pipe type) 42 Page 32
Correlating leak noise (Input parameters: pipe diameter) 43 Page 33
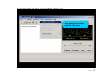
Correlating leak noise (Input parameters: sensors spacing) 44 Page 34
Correlating leak noise (Input parameters: re-correlate option) 45 Page 35
Correlating leak noise (Input parameters: save option) 46 Page 36
Correlating leak noise (Input parameters: input of file name for saved leak sound) 47 Page 37
Correlating leak noise (Input parameters: start command) 48 Page 38
Correlating leak noise (Results 1) 49 Page 39
Correlating leak noise (Results 2) 50 Page 40
Playback of leak sound 51 Page 41
Re-correlation of leak sound (1) 52 Page 42
Re-correlation of leak sound (2) 53 Page 43
Velocity calculator (1) 54 Page 44
Velocity calculator (2) 55 Page 45
Velocity calculator (3) 56 Page 46
Velocity calculator (4) Page 47 57
Options for pipe input parameters Page 48 58
Options for pipe input parameters (default setting) Page 49 59
Options for pipe input parameters (pipe wall thickness) Page 50 60