
Instruction Manual


11
CS-271T
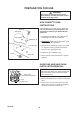
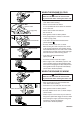
4. Mount guide bar on stud and slide toward clutch
to make saw chain installation easier. Install
chain with cutters on top of guide bar facing
forward.
5. Unlock the chain brake, and install the clutch
cover (and spiked bumper; option) over the
guide bar stud. Ensure chain tension adjuster
pin fits into the guide bar adjuster hole, brake
band is positioned around clutch drum. Tighten
clutch cover nut finger tight.
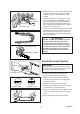
6. Turn saw over, and check brake band for correct
position on clutch drum. If brake band is not in
place around drum, remove cover, make sure
brake is unlocked, and reinstall. Tighten clutch
cover nut finger tight.
WARNING
Improper clutch cover assembly can result
in serious injury, and will cause severe
saw damage if unit is started. Never start
or operate saw if brake band is not in place
on clutch drum. Always check chain brake
operation after replacing cover. Do not
use saw if chain brake does not function
properly.
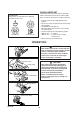
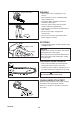
ADJUSTING CHAIN TENSION
IMPORTANT
Always loosen clutch cover nut before turning
the chain tension adjuster, otherwise the clutch
cover and tensioner will be damaged.
1. Remove spark plug lead. (See page 25)
2. Loosen a clutch cover nut, if necessary.
3. Hold the bar nose up, and turn the adjuster
screw clockwise until chain fits snugly against
underside of the bar.
4. Tighten a nut with the bar nose held up.
5. Pull the chain around the bar by hand. Loosen
the adjustment if you feel tight spots.
6. When chain is properly tensioned, tighten clutch
cover nut securely - 20 to 23 N·m (175 to 200
in. lb.).
7. Keep chain properly tensioned at all times.
Adjusting screw
Proper tension Improper tension
Unlock chain brake
Direction to tension the chain
Guide bar
adjuster hole
Clutch cover
Nut
Adjuster pin
Clutch Guide bar stud
Spiked bumper; option