
Owners Manual v.3 User guide


4 INCH CHIPPER
7
ENGLISH
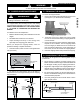
ASSEMBLY
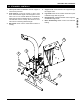
EXTENSION
TRAY HINGE
3/8” x 1-1/4”
BOLT
3/8” NUT
3/8” WASHER
5/16”
NUT
EXTENSION
TRAY LIPS
3/8” x 1”
CARRIAGE
BOLT
STUD
GAS
SPRING
STUD
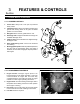
CHIPPER
CHUTE LIPS
3/8”
WASHER
3/8”
NUT
5/16”
NUT
Figure 2.4, Chipper discharge assembly
Figure 2.3, Attaching the extension tray
WARNING
Do not operate this unit without the chipper chute
BLOWER
DISCHARGE
TUBE
3/8” x 1-1/4”
BOLT
3/8” NYLOCK
NUT
DISCHARGE
CLAMP
SPACER
2.4 ATTACH CHIPPER CHUTE
2.5 ATTACH EXTENSION TRAY
(EURO MODEL ONLY)
2.6 ATTACH DISCHARGE TUBE
1. Slide the blower tube discharge clamp underneath the
2.
1. a support or hoist to hold the chipper chute in
2. Mount
1. Attach
2.
Position the li
in the hinge.
3.
and nuts.
4.
as shown in Figure 2.3.