-
SmartServer XMPP Client Developer’s Guide 078-0471-01A
-
Echelon, LON, LONWORKS, LonTalk, Neuron, LONMARK, 3120, 3150, LNS, LonMaker, and the Echelon logo are trademarks of Echelon Corporation registered in the United States and other countries. LonPoint and LonSupport are trademarks of Echelon Corporation. Other brand and product names are trademarks or registered trademarks of their respective holders.
-
Table of Contents Preface ..................................................................................................... v Purpose .......................................................................................................... vi Audience......................................................................................................... vi Requirements .................................................................................................
-
iv Preface
-
Preface You can use the Extensible Messaging and Presence Protocol (XMPP) to enable communication between SmartServers and client applications that reside behind restrictive firewalls.
-
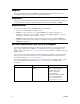
Purpose This document describes how to use XMPP to enable the SmartServer and client applications to communicate bi-directionally when they are located behind firewalls. Audience This guide is intended for application developers creating SmartServer applications that run remotely from the SmartServer, and that communicate with the SmartServer using SOAP over XMPP. Requirements Requirements for implementing a full XMPP solution are listed below: • SmartServer 2.0 SP1 (Release 4.04.088) or newer.
-
Region Europe Languages Supported English German French Italian Contact Information Echelon Europe Ltd. Suite 12 Building 6 Croxley Green Business Park Hatters Lane Watford Hertfordshire WD18 8YH United Kingdom Phone: +44 (0)1923 430200 Fax: +44 (0)1923 430300 lonsupport@echelon.co.uk Japan Japanese Echelon Japan Holland Hills Mori Tower, 18F 5-11.2 Toranomon, Minato-ku Tokyo 105-0001 Japan Phone: +81.3-5733-3320 Fax: +81.3-5733-3321 lonsupport@echelon.co.
-
viii Preface
-
1 Using SmartServer XMPP This chapter summarizes how the SmartServer and client applications can exchange data using XMPP.
-
Introduction You can use the Extensible Messaging and Presence Protocol (XMPP) to enable SmartServers and client applications to exchange data when firewalls prevent bi-directional communication. XMPP is an open technology for real-time communication that provides a decentralized client-server architecture. XMPP facilitates simple client-to-client communication where clients may reside behind different firewalls, which are typically configured to allow outgoing connections, but block incoming connections.
-
The SmartServer supports the following XMPP extensions: Bidirectional-streams Over Synchronous HTTP (BOSH, XEP-0124) Specifies how a binary stream of data can be carried on the HTTP protocol. XMPP uses a connection method that does not require a client to maintain a long-lived TCP connection. BOSH emulates a bidirectional streams that are similar to TCP binding, but implemented efficiently using multiple, synchronous HTTP or HTTPS request/response pairs.
-
home, work, or mobile). This property enables a user to log in from multiple locations. This property may be included in the JID by appending a slash followed by the name of the resource. For example, the full JID of a user's mobile account would be username@example.com/mobile. For a SmartServer client, you can append “/ilon” to identify the XMPP client as a SmartServer more easily. For example, a JID for a SmartServer with a MAC ID of 08-00-00-1A-7C-62 that uses an XMPP server with a hostname of myDomain.
-
2. Install the ejabberd Server following these steps: a. Follow the instructions in the Setup wizard to install the ejabberd Server. b. In the ejabberd Server domain window, accept the default, which is the name of your computer. Tip: You will need to enter the information you specify in the installer on multiple occasions; therefore, open a text editor, and then copy and paste the ejabberd server domain and the administrator password that you will enter in step d. c.
-
3. 6 d. Enter a password for the administrator that is at least five characters, and then confirm it. e. Complete the ejabberd Setup wizard. The installation may take up to five minutes depending on your system. Start the ejabberd Server following these steps: a. Click Start, point to Programs, point to ProcessOne, and then click Start ejabberd. b. A Command prompt opens stating that ejabberd is starting.
-
c. The Command prompt closes automatically after approximately 40 seconds, the ejabberd Server starts, and then a Web page opens automatically informing you that the ejabberd Server has started. The Start Web page includes the user name for logging in to the ejabberd Server. d. Click the admin interface link. Note: The admin interface uses port 5280 to access the ejabberd server; therefore, verify that this port is open on your computer. e.
-
4. The ejabberd Web Admin Web page opens. Step 2: Configuring the SmartServer XMPP Client You can setup a SmartServer as an XMPP client that can be accessed by one or more remote clients. Remote clients include client applications and other SmartServers.
-
2. Add the XMPP server as a host device to the SmartServer following these steps: a. In the navigation pane on the left side of the SmartServer Web interface, right-click the LAN entry, point to Add Host, and then click Server on the shortcut menu. b. The Setup – Host Web page opens and a host entry for the XMPP server is added to the navigation pane. c. In the IP or Hostname box, enter the IP address or hostname of your XMPP server, and then click Submit.
-
same XMPP server must be used by the SmartServer and all client applications that will access the SmartServer. 3. Add a message service to the XMPP server following these steps: a. Right-click the XMPP host entry, point to Add Service, and then click Message on the shortcut menu. b. The Setup – Message Web page opens. c. Enter the following properties: Message Port 10 The port used for the XMPP connection manager. This is determined by the configuration for the XMPP server.
-
The default port is 5280 for the ejabberd XMPP connection manager. Message Domain Enter the ejabberd server domain that you specified in step 2b in the Step 1: Configuring an XMPP Server section. By default, this is the name of your computer. Message Server BOSH Path Accept the default XMPP BOSH path, which is /httpbind. Typically, you should not have to change this. User Name To ensure a unique user name, enter the MAC ID for your SmartServer.
-
Step 3: Developing a Client Application You can develop a client application that communicates with one or more SmartServers using XMPP. You can build, send, and receive XMPP packets from your application, or you can use an XMPP client library to accelerate your development (for a list of client libraries, go to the XMPP Standards Foundation Web site at xmpp.org/xmpp-software/libraries/). The SmartServer team uses Smack (www.igniterealtime.org/projects/smack/), which is also used in Apache projects.
-
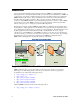
Tip: If you copied your ejabberd domain server, administrator password, MAC ID to a text file, also copy and paste the pidgin user name, resource, and password to the file. You will need this information when creating a user for the Pidgin XMPP client on the ejabberd XMPP server. f. Click Add. g. An SSL Certificate Verification dialog opens. Click Accept. SOAP/XMPP Example The following example demonstrates how a client application can communicate with the SmartServer via SOAP/XML over XMPP.
-
PAGE 23
• Read Professional XMPP Programming with JavaScript and jQuery (Moffit, Jack. Indianapolis: Wiley Publishing, 2010). • Read XMPP: The Definitive Guide. (Saint-Andre, Peter, Kevin Smith, and Remko Troncon. Sebastopol: O’Reilly Media, 2009). Step 4: Adding User Accounts to the XMPP Server After you activate the XMPP client on the SmartServer and create a client application, you need to create user accounts on the XMPP server for the SmartServer and client application.
-
5. 16 Enter the user name and password for the SmartServer following these steps: a. In the User box, enter the MAC ID of your SmartServer that you entered in the SmartServer Web interface in step 4 of the Step 2: Configuring the SmartServer section. b. In the Password box, enter the password you entered and confirmed in the SmartServer Web interface. This is also the password you specified for the administrator account in step 2d of the Step 1: Configuring an XMPP Server section. c. Click Add User.
-
e. 6. You can click the SmartServer XMPP client user name to view the connection status of your SmartServer. Repeat step 5 for the Pidgin client you created in the XMPP Chat Client Example section in Step 3: Developing a Client Application.
-
7. Repeat step 5 for any other SmartServer or client application. Step 5: Exchanging Data over XMPP After you have added user accounts to the XMPP server for the SmartServer XMPP client and your client application, you can initiate communication between the SmartServer and client application. This example connects the SmartServer via instant message to the Pidgin XMPP chat client created in the XMPP Chat Client Example section in Step 3: Developing a Client Application.
-
4. Click OK. 5. The SmartServer and Pidgin XMPP instant message dialog opens. 6. Enter any message and then press ENTER. The SmartServer will respond with the following message: “I like that statement.
-
Note: You can also view this message in the SmartServer console. See Appendix B of the SmartServer 2.0 User’s Guide for more information on using the SmartServer console application. 7. You can send a SOAP/XML message via chat following these steps: a. 20 In the Buddy List dialog, click Tools and then click Plugins. The Plugins dialog opens.
-
b. Select the XMPP Console check box and then click Close. c. Right-click the Pidgin tray icon, point to XMPP Console, and then click XMPP Console.
-
d. The XMPP Console dialog opens. e. Copy and paste the following SOAP/XML request in the text box at the bottom:
-
24 2. In the Setup – Remote i.LON SmartServer Web page, enter the IP address or hostname of the remote SmartServer in the IP or Hostname box, and then click Submit. 3. Right-click the new remote SmartServer entry in the navigation pane, point to Add Service, and then click Message. 4. Set the following properties and then click Submit: Message Domain Enter the ejabberd server domain that you specified in step 2b in the Step 1: Configuring an XMPP Server section.
-
5. Right-click the new host entry in the navigation pane, point to Add Service, and then click WebBinder Target on the shortcut menu. The Setup – Web Service page opens. 6. Click Submit. You can now use the new host as a target for Web connections as described in Creating Web Connections in Chapter 4 of the SmartServer 2.0 User’s Guide.
-
www.echelon.