NodeBuilder® Resource Report Generator User’s Guide Release 1 Revision 1 ® @ CECHELON orporation 078-0260-01A
Echelon, LON, LONWORKS, LonTalk, Neuron, LONMARK, 3120, 3150, NodeBuilder, ShortStack, the LonUsers logo, the Echelon logo, and the LONMARK logo are registered trademarks of Echelon Corporation. LonPoint, LonPoint Schedule Maker, LonMaker, and LonSupport are trademarks of Echelon Corporation. Other brand and product names are trademarks or registered trademarks of their respective holders.
Table of Contents Introduction 2 Getting Started 3 System Requirements ..................................................................................... 4 Report Generator Updates .............................................................................. 4 Viewing Reports 5 Report Structure .............................................................................................. 6 Navigation..................................................................................................
1 Introduction The NodeBuilder Resource Report Generator is a NodeBuilder Resource Editor plug-in that helps you create reports that document resources that you select. You can create reports for standard and user-defined network variable types (NVTs), configuration property types (CPTs), enumeration types, and functional profiles. The report generator converts the resource definitions that you select to extensible markup language (XML) format.
2 Getting Started The following section provides you with information on how to set up your computer to view, generate, and maintain resource reports.
System Requirements To generate reports, you need a computer with the NodeBuilder software and Internet access (optional). To view reports, you only need a computer with a Web browser (Internet Explorer 6.0 or later). Software Before installing the Report generator, you should have the following software programs installed on your computer: • NodeBuilder software version 3.1 or later (required) • Internet Explorer 6.
3 Viewing Reports This section describes how to view and analyze reports. A description of the report structure is also provided.
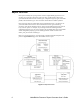
Report Structure Each report created by the report generator contains a single HTML page that serves as an index page. This page, also known as the root index, contains links to pages with report data that describes network variable types, configuration property types, functional profiles, and enumeration types. The root index is also linked to an XSLT stylesheet. Each report page may also contain links to the LONMARK Web site, or to other sites on your local network or the Internet.
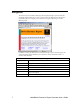
Navigation The resource report resembles a Web page and navigating through a report is much like navigating through a Web site. To view a report, launch your Web browser and open the report index page. For example, point your browser to types.lonmark.org to view the following report. In addition to using your Web browser to navigate through a report, each report page may contain navigation options that allow you to perform a variety of functions. Table 3.1 describes these functions. Table 3.
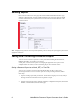
Reading Reports Each resource is listed on its own page and contains detailed information about its type, attributes, related formats, and other useful information. The report page may also list all resources referenced by the reported resource as well as those resources that refer to the reported resource. Note: Language string resources are not reported separately, but are used by the report pages in place of the appropriate references.
3. Select Show All from the report page. This displays all resources in that category (for example, all network variable types). 4. Right click the page and choose Select All. 5. On the Edit menu, click Copy. 6. Start a word processing application that supports HTML content such as Microsoft Word. 7. Create a new document. For example, on the Word File menu, click New. 8. Paste the clipboard into the new document. For example, on the Word Edit menu, click Paste.
. Click Save. Saving a Resource Report as a PDF File You can convert a resource file to an Adobe Portable Document Format (PDF) file, using Adobe Acrobat or any other tool capable of generating PDF documents. For example, to convert a Word format resource report to PDF format, follow these steps: 1. Follow the procedure described above in the Saving a Resource Report as a Word, RTF, or Text File section. Use Microsoft Word as save the file in Word format. 2.
3. On the View menu, point to Text Size, and then click Smallest. This compresses the size of the Web page text and significantly reduces the page count of your report. 4. On the File menu, click Print Preview. The Print Preview screen appears. 5. Click Print. The Print dialog box appears. 6. Click the Layout tab. 7. Select the Landscape orientation. 8. Specify 2 Pages Per Sheet. 9. Click Print. This report may contain several hundred pages.
4 Resource Report Generator Wizard The NodeBuilder Report Generator Wizard provides a simple, easy-to-use interface for generating resource reports. The wizard allows you to control many aspects of the generated report. The wizard guides you through the process of generating a resource report. An explanation of each wizard page is provided below.
Generating a Resource Report You can create a resource report using the NodeBuilder Resource Report Generator Wizard. To generate a report, follow these steps: 1. Start the NodeBuilder Resource Editor as described in Chapter 7 of the NodeBuilder User’s Guide. Table 4.1 provides a brief description of the functionality of the Resource Editor. 2. Right-click the resource catalog, a resource folder, a resource file set, or an individual resource definition, and then click Report on the shortcut menu.
Welcome Page You can choose the report output destination folder and prepare reports for hosting using the Welcome page. Set the options as described in Table 4.2 and then click Next. Table 4.2 Welcome Screen Control Options Item Description Report Output Location Specifies the location of the output folder in this box. This is the folder is where the generated report is be stored. Prepare Locally Generated Files for Hosting Enabling this option formats the report for posting at a specified URL.
Resource Reports Page You can specify the location of the resource report using the Resource Reports page. You can specify a location on a local computer, your local network, or an Internet address. By default, resource reports are generated for your computer. Set the options for each resource file set as described in Table 4.3, and then click Next. To set the options for a resource file set, select it in the Resource File Set list. Table 4.
Report Language Selection Page You can choose between 29 different report languages using the Report Language Selection page. You can define a list of preferred languages for use with the language string resources within the resource file sets. The default setting is U.S. English. The language selection only affects language resources obtained from the resource files. Other details (such as column headers and field labels) in the report are presented in U.S. English.
Support Files Preferences Page You can specify the location of the support files that are required to view a report using the Support Files Preference page. These files can be located in the Templates folder on your computer or referenced over the Internet. This page allows you to choose between using a local copy of the Templates folder or linking to the standard Templates folder on http://types.lonmark.org/templates (default setting).
Dependencies Handling Page You can include resource definitions for resources that are referenced by your report using the Dependencies Handling page. To include referenced resources, set the Automatically Include Reports for Referenced Resources checkbox. For example, if you have a UNVT that references an enumeration type defined within the same resource file set, then setting this checkbox automatically adds the enumeration type definition to the report.
Server and Transformation Page You can specify the index page file name and the transformation stylesheet on the Server and Transformation page. The default names are index.html and index.xsl. For viewing local reports, you may enter any index page name with an .html or .htm file extension in Report Start Page Name. When preparing the resource report for hosting, you should change the default page name to suit your Web server software.
Finish Page You can generate your report using the options that you specified in the wizard using the Finish page. Set the Launch Browser upon Completion checkbox to start your browser with the newly generated report. If you set this checkbox and your report does not display properly, you may need to update your browser. For browser requirements, see Getting Started.
Report Generator Progress Window The Report Generator Progress window displays the status of your report while the report is being created. Depending on the complexity of your report, this process may take several minutes. The window displays report status and any errors or warnings that occur. Upon completion, the report generator starts your Web browser and/or the Usage Hint Editor if you selected these options. Click Finish to exit the report generator.
5 Generating Reports Locally and for Hosting You can prepare resource reports for local use and for hosting on a server. Locally stored reports remain secure and do not require an Internet connection for viewing. Hosted reports allow viewing by multiple users with Internet or intranet access. You can convert resource reports into Word or PDF documents. For information on converting a resource report, see Viewing Reports and Customizing Report Presentations.
Generating a Local Report You can generate and view a report on your local hard disk. To generate a local report, follow these steps: 23 1. Start the NodeBuilder Resource Editor as described in Chapter 7 of the NodeBuilder User’s Guide. The NodeBuilder Resource Editor window appears. 2. Right-click the resource catalog file at the top of the resource catalog, and then click Report on the shortcut menu. The report generator Welcome window appears. 3. Type a directory name in Report Output Location.
7. Select a resource file set from the Resource File Set list. 8. Choose whether or not you want to exclude any file sets from your report with the Exclude this File Set from the Report check box. You can use this option to leave out file sets that are under development. 9. Set the Generate Local Report check box in Report Location. 10. Repeat steps 7, 8, and 9 for each resource file set listed in the Resource File Set list. 11. Click Next. The Report Language Selection window appears.
The default names are index.html and index.xsl. For viewing local reports, enter any report start page name with an .html or .htm file extension. For Initial XSLT Transformation Stylesheet, use the default name unless you are providing your own transformation stylesheets. For more information on modifying transformation stylesheets, see Customizing Report Presentations. 19. Click Next. The Finish window appears. 20. Set or clear Launch Browser upon Completion and Launch Usage Hint Editor.
Generating a Report for Hosting You can generate a report to be hosted on a Web server. This allows multiple users to view your report. The following procedure includes examples that describe how the standard resource report at types.lonmark.org was generated. 26 1. Start the NodeBuilder Resource Editor as described in Chapter 7 of the NodeBuilder User’s Guide. The NodeBuilder Resource Editor window appears. 2.
Resource File Set list. Preferences are ignored for all other file sets listed in the Resource File Set list. 9. Clear the Exclude this File Set from the Report check box. 10. Select Generate Local Report in Report Location. This report must be generated locally before posting. 11. Click Next. The Report Language Selection window appears. 12. Select the preferred language or languages. The default language is US English. 13. Click Next. The Support Files Preferences window appears. 14.
17. Click Next. 18. Type names in Report Start Page Name and Initial XSLT Transformation Stylesheet. Consult your Webmaster before setting the names of these fields. Typically, these pages are named default.html, default.html, or index.html. The Microsoft Internet Information Server (IIS) software works best using default.htm, and the Apache Web server works best with index.html. Other servers may require different names. For Initial XSLT Transformation Stylesheet, use the default name (index.
Note: This procedure only tests that the report was successfully hosted and that the links work properly. It does not verify each file of the report. You must configure your Web server and firewall software to allow for serving XML files with “.xml” and “.xsl” file extensions and JavaScript source files with a “.js” extension. To view previously generated reports, start your browser and go to the directory you specified in Step 4.
Verifying Hosted Reports You can verify that a report has been hosted correctly and that the Web server and related infrastructure have been set up correctly. To do this, follow these steps: 30 1. View the hosted report from outside of the network (like a normal visitor would view the report). For example, if the report is hosted on a Web server that is protected by a firewall, connect from outside of the firewall. 2. Visit the start index page, e.g. http://types.echelon.
Hosting Reports for User-Defined Resources This example shows you how to report generate and host user-defined, non-standard resource reports. 31 1. Start the NodeBuilder Resource Editor as described in Chapter 7 of the NodeBuilder User’s Guide. The NodeBuilder Resource Editor window appears. 2. Right-click a user-defined resource file set and then click Report on the shortcut menu. The Welcome dialog appears. 3. Enter a folder name in Report Output Location.
7. Click Next. 8. Set your reporting preferences for each resource file set listed in the Resource Reports page. 9. Choose whether or not you want to exclude any file sets from your report in the Exclude this File Set from the Report checkbox. This option is useful for leaving out file sets that are under development. 10. Set the Generate Local Report option in Report Location. You must generate a report before posting it.
15. Click Next. 16. Clear the Automatically Report Referenced Resources checkbox if you do not want referenced resources to be included in the report. Referenced resources are included by default. 17. Click Next. 18. Enter a name for your report start page in Report Start Page Name. Consult your Webmaster before setting the start page name. Typically, these pages are named default.html, default.html, or index.html. The Microsoft Internet Information Server (IIS) software works best using default.
22. Set Launch Usage Hint Editor features to start the Usage Hint Editor upon completion of the Wizard. You can start the Usage Hint Editor at any time to create or edit usage hints. 23. Click Next. The Report Generator Progress window appears and the report generator generates your report data. 24. Click Finish to exit the report generator. 25.
Resource File Validations When you generate a resource report with the report generator, it reports problems in the resource file set. Problems may be fatal errors or warnings. Fatal errors mean that the report information is not valid. A write protected output folder or an unavailable device resource file can cause a fatal error. Warnings will not stop the report generator from producing a valid resource report, but may indicate problems listed in Table 5.1.
Table 5.1 Resource File Validation Warnings Warning Message Displayed Description Missing Strings Warning: String ^: can not be located for program ID : This warning occurs if a string with scope selector and index as detailed in the message cannot be located for the given program ID. The typical reason is that the string is missing or the resource file set’s scope scope selector was lowered after a resource was created.
Table 5.1 Resource File Validation Warnings 37 Warning Message Displayed Description Dangling Reference Warning: Fail to resolve reference for to ::: no such referee This is a serious problem. A resource R1 refers to another resource R2, where R2 doesn’t exist. Removing resource R2 after defining R1 might cause this problem. It might be caused by an incomplete resource file catalog (the resource file set that contains R2 is missing).
6 Providing Supplementary Information When the report generator generates a report, only data that is present in the selected resource file sets is included in the report. You can add additional documentation to help describe complex resources such as functional profiles. This additional documentation is called usage hints. The report generator includes a Usage Hint Editor that allows you to easily create and edit XHTML-based usage hints.
Usage.xml Data A usage.xml file contains usage hints displayed in XHTML text. Each hint can include any XHTML and HTML tags that can be included in an HTML table cell (
| tags). However, the markup must conform to XHTML rules. Additional restrictions apply and are listed later in this document. Each usage hint applies to a part of the report. The usage.xml file contains an unlimited number of hint nodes, whose value contains the usage hint.Using the Usage Hint Editor Software The Usage Hint Editor provides a simple interface with three main components: a Resource pane, a Hint pane, and the main menu. Resource Pane The Resource pane shows a list of all resources and resource components within a resource report that may include a usage hint. Only one resource report may be open at a time. The resource items are grouped into separate categories. Table 6.2 explains the different categories used in the usage hint editor. Table 6.
Table 6.2 Usage Hint Editor Resource Categories Category Description This entry represents a hint that applies to the entire set. You can click the plus (“+”) sign next to any folder to view the resource items within the folder. If a folder is red, it does not currently contain any usage hints, but you may add one or more. If a folder is yellow, it contains usage hints that you have modified since you started the Usage Hint Editor. If a folder is white, it contains usage hints.
Hint Pane The Hint pane shows the usage hint text for the currently selected resource item in the Resource pane. The Hint pane provides a simple XHTML source editor that you can use to view, add, modify, and delete hints. Table 6.3 shows the hint editor features: Table 6.3 Hint Editor Features Feature Description Syntax Coloring Strings, tags, CDATA sections, and comments are indicated with different text colors. Fragment Insertion You can insert XHTML fragments into hint text.
Starting the Usage Hint Editor You can start the Usage Hint Editor automatically when you run the report generator, or you can start the Usage Hint Editor from Windows. To start the Usage Hint Editor automatically, set the Launch Usage Hint Editor checkbox in the Finish window of the report generator. The Usage Hint Editor appears when you click Next. The checkbox will not be available if you have not previously used the Usage Hint Editor.
Creating a Usage Hint You can create a usage hint for any resource item. To create a usage hint for a resource item, follow these steps. 44 1. Start the Usage Hint Editor as described in Starting the Usage Hint Editor. 2. Open the File menu, and then click Open. 3. Browse to a folder with an existing resource report, select a file, and then click Open. 4. Browse to the resource item in the Resource pane and click it. The Hint pane switches from grey to white. 5. Click inside the Hint pane.
XHTML Restrictions You must enter usage hints in an XHTML compliant format. However, not all data that may appear in an XHTML page may also appear in a usage hint. Variations with browser technology present challenges when creating usage hints. Before finalizing a project with complex usage hints, test and view your files before releasing your final report. Below is a short summary of XHTML details as they apply to individual usage hints: 45 • XHTML, unlike HTML, requires you to follow XML syntax rules.
7 Customizing Report Presentations This section shows you how to change the appearance of resource reports. This section provides only information about the principles of operation and does not address specific technologies.
XSLT Transformations A resource report consists of a set of XML files that can be viewed in a Web browser. The XML files contain unformatted data. They also contain references to an XSLT transformation that defines how information is presented in a generated report page. The XSLT transformation is responsible for converting information into HTML for viewing reports using a Web browser.
XSLT transformation stylesheets and JavaScript code control the entire transformation process. These files are all stored in the Templates folder on your local hard drive. The default location for the Templates folder is c:\LonWorks\Types\Templates. You can also access standard template files at the LonMark Web site (http://types.lonmark.org/Templates). Table 7.1 shows a list of available template files and a short description for each file. Table 7.1 Template Files File Description index.
Creating a Custom Report Presentation You can customize reports in two ways: you can change the layout and look of a report or you can change how a report is viewed. Changing the Report Layout You can customize the look and feel of a report (adding company logos and CI features or excluding certain data, for example), by modifying the transformations of the generated report (the index.xsl file for sub index pages and the types.xsl file for type transformation pages).
6. Specify the name and location of your modified XSLT transformation stylesheet in the Server and Transformation dialog box. 7. Finish generating the report. The changes you made to the report should appear after the report is finished compiling. Changing the Report Structure You can change the physical appearance of your report by providing your own, customized index and type transformations. These transformations process XML data produced by the report generator.