
User`s guide


52 Maintaining a Power Line Repeating Network
• If the LNS database is not empty, all the L
ONWORKS channels and devices on the SmartServer
tree are merged into the database. The domain length and domain ID properties in the database
are not changed.
After the LNS database has been updated, you can synchronize an LNS application such as the
LonMaker tool to the LNS database and then use it to manage the network.
To switch the SmartServer from standalone to LNS mode and synchronize the network in the
SmartServer tree to an LNS network database, follow these steps:
1. Install the Echelon Enterprise Services on the i.LON SmartServer DVD. This contains the LNS
Proxy Web service, which is required to access the LNS databases on an LNS server. See
Installing Echelon i.LON Enterprise Services in Chapter 2 of the i.LON SmartServer User’s Guide
for more information on how to do this.
2. Add an LNS Server to the LAN. See Adding an LNS Server to the LAN in Chapter 3 of the i.LON
SmartServer User’s Guide for more information on how to do this.
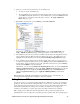
3. Click Driver.
4. Click the network icon in the SmartServer tree. The Setup - LON Network Driver Web page
opens.
5. In the Network Management Service property, click LNS Auto or LNS Manual.
• Select LNS Auto to have the SmartServer automatically synchronize with the selected LNS
network database via the LNS Proxy Web service (you can also manually initiate
synchronization by pressing the Synchronize button in the LNS Network property). In this
mode, the SmartServer independently initiates communication with the LNS Proxy Web
service. You should select this mode as long as a firewall is not blocking the SmartServer’s
access to the port on the LNS Server computer selected for the LNS Proxy Web service (port
80 by default).
• Select LNS Manual to have the SmartServer manually synchronize with the selected LNS
network database via the LNS Proxy Web service. In this mode, you can synchronize the
SmartServer with the selected LNS network database by pressing the Synchronize button in
the LNS Network property. This mode does not require the SmartServer to access to the
LNS Proxy Web service port on the LNS Server computer. You should only select this mode
if a firewall is blocking the SmartServer’s access to the LNS Proxy Web service port on the
LNS Server computer (port 80 by default). This is the default.
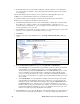
6. In the LNS Server property, select the IP address of the destination LNS server. This LNS Server
will be used to store a new LNS network database or contains the existing target LNS network