
User`s guide


i.LON SmartServer Power Line Repeating Network Management Guide 91
Creating the Weekend/Holiday Exception Schedule
To create the schedule for the weekend/holiday exception you created in the previous section, follow
these steps:
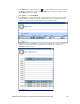
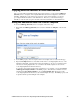
1. Click one of the red-outlined weekend dates or weekday holidays in the calendar to schedule the
events to occur on the specified range of dates. The Edit: <exception start date> dialog opens.
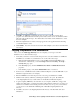
2. Create an OFF event that occurs at sunrise. To do this, follow these steps:
a. Click anywhere in the row under the Schedule, Event Time, Value, or Priority columns at
the time the event is to occur. The Add Event dialog opens. Alternatively, you can
right-click a time under the Time column or right-click the column to the right and click Add
Event on the shortcut menu to open the Add Event dialog.
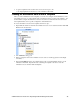
b. Under the Exception property, verify that the name you specified for the weekend/holiday
exception is selected.
c. Select the Show Advanced check box. A Function field appears in the dialog.
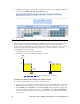
d. In the Function box, select the Sunrise (
) icon. The calculated sunrise time appears in the
Time box, which becomes read-only, and an Offset field is added to the dialog. Verify that
the Offset field is set to 00:00.
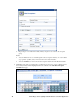
e. In the Value box, select OFF. If OFF does not appear as an option in the list, you can enter
OFF and then create an OFF preset as described in the Selecting Data Points section.
f. In the Priority box, enter a priority that is lower than the 255 priority used for the weekend
daily schedule (this example use a priority of 210). This priority essentially locks any events
scheduled in the weekend daily schedule that have lower priorities (255); however, this
example does not have any events in the weekend daily schedule.
g. Click Close to return to the Edit: <exception start date> dialog.
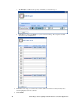
3. Create an #ON_60 event that occurs at sundown. To do this, follow these steps:
a. Under the Exception property, verify that the name you specified for the weekend/holiday
exception is selected.
b. Select the Show Advanced check box. A Function field appears in the dialog.
c. In the Function box, select the Sundown (
) icon. The calculated sundown time appears in
the Time box, which becomes read-only, and an Offset field is added to the dialog. Verify
that the Offset field is set to 00:00.
d. In the Value box, select ON_60. If ON_60 does not appear as an option in the list, you can
enter ON_60 and then create an ON_60 preset as described in the Selecting Data Points
section.