
System information


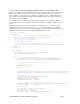

Table Of Contents
- Table of Contents
- 1 Introduction to the SmartServer SOAP/XML Interface
- 2 SOAP Messages and the SmartServer WSDL File
- 2.1 SmartServer Naming Structure
- 2.2 SmartServer WSDL File
- 2.3 Security
- 2.4 SOAP Request and Response Message Structure
- 2.5 SOAP Messages Formats
- 2.6 Data Point References
- 2.7 UCPTcurrentConfig
- 2.8 Fault Structure
- 2.9 LonString type
- 2.10 SOAP Message Examples
- 3 SmartServer Applications and the SOAP/XML Interface
- 3.1 Overview of SmartServer Applications
- 3.2 SmartServer XML Configuration Files
- 3.3 SmartServer Resource Files
- 3.3.1 Standard Network Variable Type (SNVT) Device Resource Files
- 3.3.2 Standard Configuration Property Type (SCPT) Device Resource Files
- 3.3.3 User Defined Network Variable Type (UNVT) Device Resource Files
- 3.3.4 User Defined Configuration Property Type (UCPT) Device Resource Files
- 3.3.5 Data Point Templates
- 3.3.6 Data Formatting
- 3.4 SOAP Functions
- 3.5 Performance Issues
- 4 Using the SmartServer Data Server
- 4.1 Creating and Modifying the Data Point XML Files
- 4.2 Overview of the Data Point XML File
- 4.3 Data Server SOAP Interface
- 4.3.1 Using the List Function on the Data Server
- 4.3.2 Using the Get Function on the Data Server
- 4.3.3 Using the Set Function on the Data Server
- 4.3.4 Using the Read Function on the Data Server
- 4.3.5 Using the Write Function on the Data Server
- 4.3.6 Using the Invoke Function to Reset Data Point Priorities
- 4.3.7 Data Point Values and Priority Levels
- 4.3.8 Using the Delete Function on the Data Server
- 4.4 Using the Web Binder Application
- 5 Data Loggers
- 5.1 Overview of the Data Logger XML File
- 5.2 Creating and Modifying the Data Logger XML File
- 5.3 Data Logger SOAP Interface
- 6 Alarm Generator
- 6.1 Overview of the Alarm Generator XML File
- 6.2 Creating and Modifying the Alarm Generator XML File
- 6.3 Alarm Generator SOAP Interface
- 7 Alarm Notifier
- 7.1 Overview of the AlarmNotifier XML File
- 7.2 Creating and Modifying the Alarm Notifier XML File
- 7.3 Alarm Notifier SOAP Interface
- 7.3.1 Using the List Function on an Alarm Notifier
- 7.3.2 Using the Get Function on an Alarm Notifier
- 7.3.3 Using the Set Function on an Alarm Notifier
- 7.3.4 Using the Read Function on an Alarm Notifier
- 7.3.5 Using the Write Function on an Alarm Notifier Log File
- 7.3.6 Using the Clear Function on an Alarm Notifier Log File
- 7.3.7 Using the Delete Function on an Alarm Notifier
- 8 Analog Function Block
- 9 Scheduler
- 9.1 Overview of the Scheduler XML File
- 9.2 Creating and Modifying the Scheduler XML File
- 9.3 Scheduler SOAP Interface
- 10 Calendar
- 10.1 Overview of the Calendar XML File
- 10.2 Creating and Modifying the Calendar XML File
- 10.3 Calendar SOAP Interface
- 11 Real Time Clock
- 12 Type Translator
- 12.1 Overview of the Type Translator XML File
- 12.2 Creating and Modifying the Type Translator XML File
- 12.3 Type Translator SOAP Interface
- 12.3.1 Using the List Function on a Type Translator
- 12.3.2 Using the Get Function on a Type Translator
- 12.3.3 Using the Set Function on a Type Translator
- 12.3.4 Pre Defined Type Translator Rules
- 12.3.4.1 16xSNVT_switch_TO_SNVT_state
- 12.3.4.2 SNVT_lev_disc_TO_SNVT_occupancy
- 12.3.4.3 SNVT_lev_disc_TO_SNVT_switch
- 12.3.4.4 SNVT_occupancy_TO_SNVT_setting
- 12.3.4.5 SNVT_scene_TO_SNVT_setting
- 12.3.4.6 SNVT_scene_TO_SNVT_switch
- 12.3.4.7 SNVT_setting_TO_SNVT_switch
- 12.3.4.8 SNVT_state_TO_16xSNVT_switch
- 12.3.4.9 SNVT_switch_TO_SNVT_lev_disc
- 13 Type Translator Rules
- 14 LonWorks Driver
- 14.1 LonWorks Networks
- 14.2 LonWorks Channels
- 14.3 LonWorks Devices
- 14.4 Routers
- 14.5 Remote Network Interface
- 14.6 LonWorks Functional Blocks
- 14.7 Network Variables (LonWorks Data Points)
- 14.8 Configuration Properties (LonWorks Data Points)
- 14.9 LonWorks Connections
- 15 Modbus Driver
- 16 M Bus Driver
- 17 Virtual Driver
- 18 File System Data
- 19 System Information Methods
- 20 Using the SOAP Interface as a Web Service
- 21 Programming Examples
- 21.1 Visual C#.NET Examples
- 21.1.1 Reading and Writing Data Point Values in Visual C# .NET
- 21.1.2 Creating and Reading a Data Logger in Visual C# .NET
- 21.1.3 Creating a Scheduler and Calendar in Visual C# .NET
- 21.1.4 Creating and Installing a LonWorks Device in Visual C# .NET
- 21.1.5 Commissioning External Devices in Visual C# .NET
- 21.1.6 Discovering and Installing External Devices in Visual C# .NET
- 21.1.7 Configuring the SmartServer in Visual C# .NET
- 21.2 Visual Basic.NET Examples
- 21.2.1 Reading and Writing Data Point Values in Visual Basic.NET
- 21.2.2 Creating and Reading a Data Logger in Visual Basic. NET
- 21.2.3 Creating a Scheduler and Calendar in Visual Basic.NET
- 21.2.4 Creating and Installing a LonWorks Device in Visual Basic.NET
- 21.2.5 Commissioning External Devices in Visual Basic.NET
- 21.2.6 Discovering and Installing External Devices in Visual Basic.NET
- 21.2.7 Configuring the SmartServer in Visual Basic.NET
- 21.1 Visual C#.NET Examples
- 22 Programming the SmartServer with Java
- Appendix A: SOAP Tester Example
i.LON SmartServer 2.0 Programmer’s Reference
21-42
Console.ReadLine()
Finally
SmartServer.CloseBindingToSmartServer()
End Try
End Sub
End Module
21.2.4
Creating and Installing a LONWORKS Device in Visual Basic.NET
This VB console example creates two LONWORKS devices, and then it commissions the devices, starts
the devices’ applications, and gets the devices’ templates (to display the devices’ functional blocks and
data points in the SmartServer Web interface). The example then prints out the names and statuses of
the devices that have been installed. Note that you need to replace the values of the <UCPTname>,
<UCPTuniqueID>, <UCPTprogramID>, and <UCPTurlTemplate> properties provided in this example
with those of the devices you are creating and installing.
You can execute this code after you have referenced and inherited from the SmartServer WSDL as
described in
section 20.1, and instantiated and initialized the Web service client as described in section
20.2. You must also upload the device interface (XIF) files of the devices you are creating to the
root/LonWorks/import folder on the SmartServer flash disk.
For more information on the L
ONWORKS device properties set in this example, see section 14.3.2,
Using the Get Function on a LonWorks Device. For more information on the network management
commands issues in this example, see
section 14.3.3.1, Issuing Network Management Commands.
Module InstallDeviceModule
'Function required for converting device Neuron IDs and program IDs to a byte[]
Public Function HexStringToArray(ByVal str As String) As Byte()
Dim nLen As Integer = str.Length / 2
Dim arr As Byte() = New Byte(nLen - 1) {}
For i As Integer = 0 To nLen - 1
Dim strByte As String = str.Substring(i * 2, 2)
arr(i) = [Byte].Parse(strByte, System.Globalization.NumberStyles.HexNumber)
Next
Return arr
End Function
Public Sub Main()
Dim SmartServer As iLON_SoapCalls = New iLON_SoapCalls
SmartServer.BindClientToSmartServer()
Try
' -------------- CREATING LONWORKS DEVICES --------------
'Create a new LON_Device_Cfg Item
Dim my_LON_Device1 As New iLON_SmartServer.LON_Device_Cfg()
Dim my_LON_Device2 As New iLON_SmartServer.LON_Device_Cfg()
'Create an ItemCfgColl to store the LON Devices we just created
Dim ItemCfgColl As
New iLON_SmartServer.Item_CfgColl()
ItemCfgColl.Item = New iLON_SmartServer.Item_Cfg(1) {}
ItemCfgColl.Item(0) = my_LON_Device1
ItemCfgColl.Item(1) = my_LON_Device2
'=====CREATING AND INSTALLING LON DEVICE #1==================
' specify properties of new LON Device #1
my_LON_Device1.UCPTname = "Net/LON/DIO-1"
my_LON_Device1.UCPTlocal = 0
my_LON_Device1.UCPTuniqueId = HexStringToArray("00a145791500")