
System information


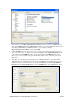


Table Of Contents
- Table of Contents
- 1 Introduction to the SmartServer SOAP/XML Interface
- 2 SOAP Messages and the SmartServer WSDL File
- 2.1 SmartServer Naming Structure
- 2.2 SmartServer WSDL File
- 2.3 Security
- 2.4 SOAP Request and Response Message Structure
- 2.5 SOAP Messages Formats
- 2.6 Data Point References
- 2.7 UCPTcurrentConfig
- 2.8 Fault Structure
- 2.9 LonString type
- 2.10 SOAP Message Examples
- 3 SmartServer Applications and the SOAP/XML Interface
- 3.1 Overview of SmartServer Applications
- 3.2 SmartServer XML Configuration Files
- 3.3 SmartServer Resource Files
- 3.3.1 Standard Network Variable Type (SNVT) Device Resource Files
- 3.3.2 Standard Configuration Property Type (SCPT) Device Resource Files
- 3.3.3 User Defined Network Variable Type (UNVT) Device Resource Files
- 3.3.4 User Defined Configuration Property Type (UCPT) Device Resource Files
- 3.3.5 Data Point Templates
- 3.3.6 Data Formatting
- 3.4 SOAP Functions
- 3.5 Performance Issues
- 4 Using the SmartServer Data Server
- 4.1 Creating and Modifying the Data Point XML Files
- 4.2 Overview of the Data Point XML File
- 4.3 Data Server SOAP Interface
- 4.3.1 Using the List Function on the Data Server
- 4.3.2 Using the Get Function on the Data Server
- 4.3.3 Using the Set Function on the Data Server
- 4.3.4 Using the Read Function on the Data Server
- 4.3.5 Using the Write Function on the Data Server
- 4.3.6 Using the Invoke Function to Reset Data Point Priorities
- 4.3.7 Data Point Values and Priority Levels
- 4.3.8 Using the Delete Function on the Data Server
- 4.4 Using the Web Binder Application
- 5 Data Loggers
- 5.1 Overview of the Data Logger XML File
- 5.2 Creating and Modifying the Data Logger XML File
- 5.3 Data Logger SOAP Interface
- 6 Alarm Generator
- 6.1 Overview of the Alarm Generator XML File
- 6.2 Creating and Modifying the Alarm Generator XML File
- 6.3 Alarm Generator SOAP Interface
- 7 Alarm Notifier
- 7.1 Overview of the AlarmNotifier XML File
- 7.2 Creating and Modifying the Alarm Notifier XML File
- 7.3 Alarm Notifier SOAP Interface
- 7.3.1 Using the List Function on an Alarm Notifier
- 7.3.2 Using the Get Function on an Alarm Notifier
- 7.3.3 Using the Set Function on an Alarm Notifier
- 7.3.4 Using the Read Function on an Alarm Notifier
- 7.3.5 Using the Write Function on an Alarm Notifier Log File
- 7.3.6 Using the Clear Function on an Alarm Notifier Log File
- 7.3.7 Using the Delete Function on an Alarm Notifier
- 8 Analog Function Block
- 9 Scheduler
- 9.1 Overview of the Scheduler XML File
- 9.2 Creating and Modifying the Scheduler XML File
- 9.3 Scheduler SOAP Interface
- 10 Calendar
- 10.1 Overview of the Calendar XML File
- 10.2 Creating and Modifying the Calendar XML File
- 10.3 Calendar SOAP Interface
- 11 Real Time Clock
- 12 Type Translator
- 12.1 Overview of the Type Translator XML File
- 12.2 Creating and Modifying the Type Translator XML File
- 12.3 Type Translator SOAP Interface
- 12.3.1 Using the List Function on a Type Translator
- 12.3.2 Using the Get Function on a Type Translator
- 12.3.3 Using the Set Function on a Type Translator
- 12.3.4 Pre Defined Type Translator Rules
- 12.3.4.1 16xSNVT_switch_TO_SNVT_state
- 12.3.4.2 SNVT_lev_disc_TO_SNVT_occupancy
- 12.3.4.3 SNVT_lev_disc_TO_SNVT_switch
- 12.3.4.4 SNVT_occupancy_TO_SNVT_setting
- 12.3.4.5 SNVT_scene_TO_SNVT_setting
- 12.3.4.6 SNVT_scene_TO_SNVT_switch
- 12.3.4.7 SNVT_setting_TO_SNVT_switch
- 12.3.4.8 SNVT_state_TO_16xSNVT_switch
- 12.3.4.9 SNVT_switch_TO_SNVT_lev_disc
- 13 Type Translator Rules
- 14 LonWorks Driver
- 14.1 LonWorks Networks
- 14.2 LonWorks Channels
- 14.3 LonWorks Devices
- 14.4 Routers
- 14.5 Remote Network Interface
- 14.6 LonWorks Functional Blocks
- 14.7 Network Variables (LonWorks Data Points)
- 14.8 Configuration Properties (LonWorks Data Points)
- 14.9 LonWorks Connections
- 15 Modbus Driver
- 16 M Bus Driver
- 17 Virtual Driver
- 18 File System Data
- 19 System Information Methods
- 20 Using the SOAP Interface as a Web Service
- 21 Programming Examples
- 21.1 Visual C#.NET Examples
- 21.1.1 Reading and Writing Data Point Values in Visual C# .NET
- 21.1.2 Creating and Reading a Data Logger in Visual C# .NET
- 21.1.3 Creating a Scheduler and Calendar in Visual C# .NET
- 21.1.4 Creating and Installing a LonWorks Device in Visual C# .NET
- 21.1.5 Commissioning External Devices in Visual C# .NET
- 21.1.6 Discovering and Installing External Devices in Visual C# .NET
- 21.1.7 Configuring the SmartServer in Visual C# .NET
- 21.2 Visual Basic.NET Examples
- 21.2.1 Reading and Writing Data Point Values in Visual Basic.NET
- 21.2.2 Creating and Reading a Data Logger in Visual Basic. NET
- 21.2.3 Creating a Scheduler and Calendar in Visual Basic.NET
- 21.2.4 Creating and Installing a LonWorks Device in Visual Basic.NET
- 21.2.5 Commissioning External Devices in Visual Basic.NET
- 21.2.6 Discovering and Installing External Devices in Visual Basic.NET
- 21.2.7 Configuring the SmartServer in Visual Basic.NET
- 21.1 Visual C#.NET Examples
- 22 Programming the SmartServer with Java
- Appendix A: SOAP Tester Example
i.LON SmartServer 2.0 Programmer’s Reference
20-21
a. Open a Command Prompt window to the following folder on your computer:
C:\Program Files\Microsoft SDKs\Windows\v6.0A\bin folder.
b. Enter the following command (in one line):
wsdl.exe /language:CS /serverInterface /protocol:SOAP /n:iLon100e4 /u:<SmartServer user
name> /p:< SmartServer password> “http://<SmartServer IP
address>/WSDL/V4.0/iLON100.wsdl” /out: “<output directory>\iLON100proxy.cs”
SmartServer user name is the name used to log on to your SmartServer. This is ilon by
default.
SmartServer password is the password used to log on to your SmartServer. This is ilon
by default.
SmartServer IP address is the IP address of your SmartServer.
output directory is the destination folder on your computer where the proxy class is to be
stored.
The following example demonstrates how to enter a command that stores the proxy class
in a C:/LonWorks/SmartServerProxyClass folder:
wsdl.exe /language:CS /serverInterface /protocol:SOAP /n:iLon100e4 /u:ilon /p:ilon
"http://10.2.124.82/WSDL/V4.0/iLON100.wsdl"
/out:"C:\lonworks\SmartServerProxyClass\iLON100proxy.cs"
Note: /serverInterface is used instead of /server because the /server Server switch has been
deprecated. Using the /serverInterface switch generates an abstract class for an XML web
service implementation using ASP.NET based on the contracts. The default is to generate a
client proxy class.
2. A file called iLON100.cs is generated in the specified destination folder. You will use this file
after you create a new Web service project. You can optionally specify other languages such as
Visual Basic .NET. See the MSDN documentation for more information on this command.
3. Create a new Web service project using ASP .NET Web Service. The sample code below is
written in Visual C# .NET, and uses “WebBinder” as the project name.