
System information


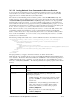

Table Of Contents
- Table of Contents
- 1 Introduction to the SmartServer SOAP/XML Interface
- 2 SOAP Messages and the SmartServer WSDL File
- 2.1 SmartServer Naming Structure
- 2.2 SmartServer WSDL File
- 2.3 Security
- 2.4 SOAP Request and Response Message Structure
- 2.5 SOAP Messages Formats
- 2.6 Data Point References
- 2.7 UCPTcurrentConfig
- 2.8 Fault Structure
- 2.9 LonString type
- 2.10 SOAP Message Examples
- 3 SmartServer Applications and the SOAP/XML Interface
- 3.1 Overview of SmartServer Applications
- 3.2 SmartServer XML Configuration Files
- 3.3 SmartServer Resource Files
- 3.3.1 Standard Network Variable Type (SNVT) Device Resource Files
- 3.3.2 Standard Configuration Property Type (SCPT) Device Resource Files
- 3.3.3 User Defined Network Variable Type (UNVT) Device Resource Files
- 3.3.4 User Defined Configuration Property Type (UCPT) Device Resource Files
- 3.3.5 Data Point Templates
- 3.3.6 Data Formatting
- 3.4 SOAP Functions
- 3.5 Performance Issues
- 4 Using the SmartServer Data Server
- 4.1 Creating and Modifying the Data Point XML Files
- 4.2 Overview of the Data Point XML File
- 4.3 Data Server SOAP Interface
- 4.3.1 Using the List Function on the Data Server
- 4.3.2 Using the Get Function on the Data Server
- 4.3.3 Using the Set Function on the Data Server
- 4.3.4 Using the Read Function on the Data Server
- 4.3.5 Using the Write Function on the Data Server
- 4.3.6 Using the Invoke Function to Reset Data Point Priorities
- 4.3.7 Data Point Values and Priority Levels
- 4.3.8 Using the Delete Function on the Data Server
- 4.4 Using the Web Binder Application
- 5 Data Loggers
- 5.1 Overview of the Data Logger XML File
- 5.2 Creating and Modifying the Data Logger XML File
- 5.3 Data Logger SOAP Interface
- 6 Alarm Generator
- 6.1 Overview of the Alarm Generator XML File
- 6.2 Creating and Modifying the Alarm Generator XML File
- 6.3 Alarm Generator SOAP Interface
- 7 Alarm Notifier
- 7.1 Overview of the AlarmNotifier XML File
- 7.2 Creating and Modifying the Alarm Notifier XML File
- 7.3 Alarm Notifier SOAP Interface
- 7.3.1 Using the List Function on an Alarm Notifier
- 7.3.2 Using the Get Function on an Alarm Notifier
- 7.3.3 Using the Set Function on an Alarm Notifier
- 7.3.4 Using the Read Function on an Alarm Notifier
- 7.3.5 Using the Write Function on an Alarm Notifier Log File
- 7.3.6 Using the Clear Function on an Alarm Notifier Log File
- 7.3.7 Using the Delete Function on an Alarm Notifier
- 8 Analog Function Block
- 9 Scheduler
- 9.1 Overview of the Scheduler XML File
- 9.2 Creating and Modifying the Scheduler XML File
- 9.3 Scheduler SOAP Interface
- 10 Calendar
- 10.1 Overview of the Calendar XML File
- 10.2 Creating and Modifying the Calendar XML File
- 10.3 Calendar SOAP Interface
- 11 Real Time Clock
- 12 Type Translator
- 12.1 Overview of the Type Translator XML File
- 12.2 Creating and Modifying the Type Translator XML File
- 12.3 Type Translator SOAP Interface
- 12.3.1 Using the List Function on a Type Translator
- 12.3.2 Using the Get Function on a Type Translator
- 12.3.3 Using the Set Function on a Type Translator
- 12.3.4 Pre Defined Type Translator Rules
- 12.3.4.1 16xSNVT_switch_TO_SNVT_state
- 12.3.4.2 SNVT_lev_disc_TO_SNVT_occupancy
- 12.3.4.3 SNVT_lev_disc_TO_SNVT_switch
- 12.3.4.4 SNVT_occupancy_TO_SNVT_setting
- 12.3.4.5 SNVT_scene_TO_SNVT_setting
- 12.3.4.6 SNVT_scene_TO_SNVT_switch
- 12.3.4.7 SNVT_setting_TO_SNVT_switch
- 12.3.4.8 SNVT_state_TO_16xSNVT_switch
- 12.3.4.9 SNVT_switch_TO_SNVT_lev_disc
- 13 Type Translator Rules
- 14 LonWorks Driver
- 14.1 LonWorks Networks
- 14.2 LonWorks Channels
- 14.3 LonWorks Devices
- 14.4 Routers
- 14.5 Remote Network Interface
- 14.6 LonWorks Functional Blocks
- 14.7 Network Variables (LonWorks Data Points)
- 14.8 Configuration Properties (LonWorks Data Points)
- 14.9 LonWorks Connections
- 15 Modbus Driver
- 16 M Bus Driver
- 17 Virtual Driver
- 18 File System Data
- 19 System Information Methods
- 20 Using the SOAP Interface as a Web Service
- 21 Programming Examples
- 21.1 Visual C#.NET Examples
- 21.1.1 Reading and Writing Data Point Values in Visual C# .NET
- 21.1.2 Creating and Reading a Data Logger in Visual C# .NET
- 21.1.3 Creating a Scheduler and Calendar in Visual C# .NET
- 21.1.4 Creating and Installing a LonWorks Device in Visual C# .NET
- 21.1.5 Commissioning External Devices in Visual C# .NET
- 21.1.6 Discovering and Installing External Devices in Visual C# .NET
- 21.1.7 Configuring the SmartServer in Visual C# .NET
- 21.2 Visual Basic.NET Examples
- 21.2.1 Reading and Writing Data Point Values in Visual Basic.NET
- 21.2.2 Creating and Reading a Data Logger in Visual Basic. NET
- 21.2.3 Creating a Scheduler and Calendar in Visual Basic.NET
- 21.2.4 Creating and Installing a LonWorks Device in Visual Basic.NET
- 21.2.5 Commissioning External Devices in Visual Basic.NET
- 21.2.6 Discovering and Installing External Devices in Visual Basic.NET
- 21.2.7 Configuring the SmartServer in Visual Basic.NET
- 21.1 Visual C#.NET Examples
- 22 Programming the SmartServer with Java
- Appendix A: SOAP Tester Example
i.LON SmartServer 2.0 Programmer’s Reference
14-7
synchronization), you can perform a manual synchronization to update the LNS network database with
network configuration changes made with the SmartServer. Even if <UCPTlnsSync> is set to
SYNC_LNS (LNS Auto; automatic synchronization), you may still want to periodically synchronize
the SmartServer to update the SmartServer with changes made to the LNS network database by the
LonMaker tool or other LNS application.
You can synchronize an entire L
ONWORKS network at one time, or you can select individual items to
be synchronized. The input parameters you supply to this function include one <Item> element with a
LON_Network_Command_Invoke type and a Command attribute that is set to “Syncronize”
(misspelled intentionally). The <Item> element must include the <UCPTname> of the network object
or objects being synchronized.
If you are synchronizing the entire network at once, you can synchronize only those objects in the
network that have been modified in the SmartServer’s internal database, or you can synchronize all
objects regardless if they have been modified. To synchronize all the objects in the network, you insert
a <UCPTannotation> element and set its action attribute to “SyncAll” in the <Item> element. The
benefit of using the “SyncAll” option is that it synchronizes the LON driver properties of the objects if
they have been changed in the SmartServer’s internal database or the LNS network database.
Examples of LON driver properties that you may want to keep synced include the timing parameters of
a channel, the commission and application statuses of a device, and the format description of a data
point.
If you are synchronizing individual channels, devices, or functional blocks, you can also synchronize
the child objects of the specified objects. For example, when you synchronize a device, you can
synchronize just that device, or you can synchronize the device and all of its child functional blocks
and data points. To synchronize an object and all of its child objects, you insert a <UCPTannotation>
element set its action attribute to “SyncRecursive” in the <Item> element.
Consider a scenario where you have multiple external devices on “Channel 1” of the “Building”
network (Building/Channel 1/Device <x>, where x differentiates the devices).
• The following example demonstrates how to synchronize the network to the LNS network
database (only objects that have been changed in the SmartServer’s internal database):
<InvokeCmd xmlns="http://wsdl.echelon.com/web_services_ns/ilon100/v4.0/message/">
<iLonItem>
<Item xsi:type="LON_Network_Command_Invoke" Command="Syncronize">
<UCPTname>Building</UCPTname>
</Item>
</iLonItem>
</InvokeCmd>
• The following example demonstrates how to synchronize the network to the LNS network
database (updating all objects and their LON driver properties):
<InvokeCmd xmlns="http://wsdl.echelon.com/web_services_ns/ilon100/v4.0/message/">
<iLonItem>
<Item xsi:type="LON_Network_Command_Invoke" Command="Syncronize">
<UCPTname>Building</UCPTname>
<UCPTannotation>action="SyncAll"</UCPTannotation>
</Item>
</iLonItem>
</InvokeCmd>
• The following example demonstrates how to synchronize two devices on the network to the LNS
network database (but no child functional blocks or data points):
<InvokeCmd xmlns="http://wsdl.echelon.com/web_services_ns/ilon100/v4.0/message/">
<iLonItem>
<Item xsi:type="LON_Network_Command_Invoke" Command="Syncronize">
<UCPTname>Building/Channel 1/Device 1</UCPTname>
</Item>
<Item xsi:type="LON_Network_Command_Invoke" Command="Syncronize">
<UCPTname>Building/Channel 1/Device 2</UCPTname>
</Item>
</iLonItem>