
User's Manual


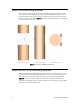
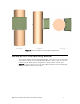


Table Of Contents
- Welcome
- Audience
- Related Documentation
- FCC Compliance Notice
- RF Statements
- EMC and Safety Statements
- Declaration of Conformity
- Introduction
- Pole Mount Installation
- Pad Mount Installation
- Introduction
- Required Tools
- Installation Location
- Preparing the Transformer Pad
- Preparing for Installation
- Performing the Installation
- Extend Pad Mounting Bracket
- Attach Pad Mounting Bracket to Lifting Nut
- Attach Conduit Housing to Pad Mounting Bracket
- Insert Conduit Thread into Conduit Housing
- Attach ECN to Pad Mounting Bracket
- Secure ECN to Pad Mounting Bracket
- Connect the ECN to Power and the Network
- Close and Lock the Conduit Housing
- Complete the Installation
- Verifying Successful Installation
- Field Replacement for an ECN 7000 Series Device
- ECN 7000 Series Specifications
- Safety and High-Voltage Warnings
- ESD and Battery Warnings

6 Pole Mount Installation
Attach Pole Mounting Bracket
You connect the ECN to the utility pole using the hole that you drilled into the
pole to prepare for installation; see
Preparing for Installation
on page 5. Place
the bracket against the pole, insert the support bolt, and secure the bolt with a
washer and nut, as shown in
Figure 1. The Pole Mounting Bracket is designed to
fit any standard utility pole.
Figure 1. Attach Pole Mounting Bracket
Attach ECN to Pole Mounting Bracket
After the Pole Mounting Bracket is securely attached to the utility pole, you can
attach the ECN to the Pole Mounting Bracket. The top of the back side of the
ECN includes two tabs that slide into the top of the Pole Mounting Bracket.
Figure 2 on page 7 shows the ECN attached to the Pole Mounting Bracket.
Note that if you should need to replace an ECN, you need replace only the ECN
and not the Pole Mounting Bracket.