
User`s manual

EC-520 User’s Manual
- 6 -
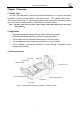
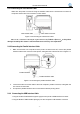
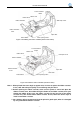
2.4 Connecting the Power Supply
1. Make sure the power switch is in the OFF position (when the pressed side of power switch is in
the “O” position).
2. Check and ensure the voltage supplied from electrical outlet is matching with the printer’s
specification.
3. Plug the AC adapter to printer's power connector.
4. Plug one side of the power cord to the AC adapter, and then plug the other side of the power
cord to the electrical outlet with ground.
Warning: 1. If the voltage cannot match, please contact your dealer for solution, and do not
connect the power cord to the electrical outlet.
2. Must use the electrical outlet with ground wire.
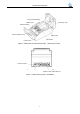
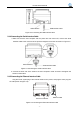
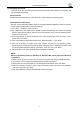
2.5 Installing and replacing the Ribbon Cassette
1. Make sure the printer is turned off.
2. If you bought the printer without auto-cutter (EC-520), please open the ribbon cassette cover, and
then install the ribbon cassette directly. If you bought the printer with auto-cutter (EC-520C), first,
please open the ribbon cassette cover and the roll paper cover, and turn up the auto-cutter as
shown below, then install the ribbon cassette.
3. Turn the ribbon knob several times in the direction shown by the arrow to tighten the ribbon core
for easy installing.
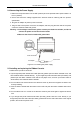
4. Insert the ribbon cassette with the ribbon knob on left and push the ribbon cassette down until it
clicks.
5. Turn the ribbon knob 2 or 3 times in the direction shown by the arrow again to tighten the ribbon
core.
6. If you bought the printer without auto-cutter (EC-520), please close the cover directly. If you
bought the printer with auto-cutter (EC-520C), please first turn the auto-cutter down to the original
position, then close the printer cover.
Figure 2-7 Connecting the power supply
Power Connector
AC Adapter
Power Cord