
User guide


16-8-2010 4 033000=15090C
The TAKE 10 can also control X10 RF devices, which allows you to control different electrical
devices located in various physical locations around the house, using radio frequency (RF)
signals. This gives you the freedom to control devices that are not in the same physical
location as the remote.
The TAKE 10 is very intuitive and has built-in Help, but it’s very useful to become familiar with
the remote by first reading this manual. After you’ve become familiar with the TAKE 10, the
first thing you need to do is to install the batteries and setup your remote using the on-screen
instructions.
Thank you for purchasing this remote, and we trust that it will give you many years of service.
Contents
1. Introduction
2. Insert the batteries
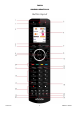
3. Button Functions
4. Setup
4.1 Using the Wizard
4.2 Setting Up Your Devices
4.3 Setting Up Your Favourites
5. Using The Remote
6. Learning
6.1 Main Keys
6.2 Side Keys
7. Setting Up More
7.1 Devices
7.2 Favourites
8. Setting up X10 devices
9. Advanced Settings
10. Troubleshooting
11. Tips & Tricks about learning IR codes to a remote
1. Introduction
The TAKE 10 is designed to control up to 10 devices:
E.g.: TV, VCR, DVD, SAT or AUDIO. The TAKE 10 contains a library of codes
that are pre-programmed into the remote control. This library covers
nearly all the audio video products on the market today. The
codes have to be programmed once before use. This can be
done in different ways:
a. Using the Wizard to find the correct infra red codes.
b. Learn the codes from the original remote.
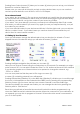
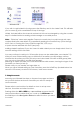
2. Insert the batteries
1. On the back of the remote, push down on the tab and lift the cover off.
2. Insert 3 AA Alkaline batteries taking note of the polarity (+/-).
3. Press the battery cover back into place.