
User guide


16-8-2010 10 033000=15090C
[4] [5]
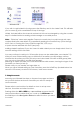
If you wish to add a label to the logo press the Side Key next to the ‘Label’ text. This will take
you to screen [5] with a small label on top of the logo.
Initially, the label will be the channel number but this can be changed by using the numeric
keys in a similar fashion to sending a text message on a mobile phone.
Note – “Triple tap” name entry applies. Tap each numeric key to cycle through ALL caps,
numbers and lower case letters. E.g. repeatedly pressing the number 2 key cycles through
A,B,C,2,a,b,c. Pressing the 9 key cycles through W,X,Y,Z,9,w,x,y,z.
A space can be selected with the 0 (zero) key.
Adding a label is optional, if you don’t want to add a label you can simply select ‘Save’ to
save the settings for this favourite.
You may continue to add up to 10 favourites (more can be added later, see chapter 7.2).
After you have finished setting up your initial set of favourites you will be taken choose
whether the favourites you have just set up are to be stored in the HIS or HERS group (later
you can set up favourites in several other groups.)
Selecting an option will take you to the HIS or HER favourite screen, showing the logos of the
favourites you have just set up.
Please note you can reorder the logos later on.
When you have finished setting up your favourites, press the HOME key (located below the
remote’s LCD screen) to return to the home / main menu screen.
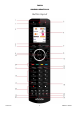
5. Using the remote
Assuming you followed the steps on the previous pages and have
set up some devices and some favourites you are now ready to
use the remote.
Please refer to next sections for details on how to set up more
devices, favourites and other functions.
Pressing either the HIS or HERS key a second time accesses the X10
Home Automation modules that you’ve set up for All Rooms. Use
the Side Keys or the Navigation Buttons to select the icon you want
to control.