
Installation & Assembly
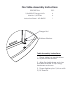
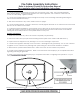
Table Of Contents

Black Hose from Tank
Metal In-Line Hose to Burner
Burner Hose Attachment:
1. Locate provided flexible black propane hose and attach to key valve. This is the fitting directly
inline with key fitting. All metal fittings MUST be two wrench tightend, one to hold the valve and one
to turn the valve fitting. Tighten securely.
2. Locate the metal flex-line gas hose and tighten securely to the remaining valve fitting following the
above method described in step 1.
3. With hoses attached to key valve, table can be set upright.
4. Locate the black burner. Using two wrenches, securely tighten the flare nut on the free end of the metal
flex hose to the orifice on the burner.
5. For liquid propane installations, the air shutter may be left open as shown in Dia 2 to prevent sooting.
To adjust air shutter, loosen the small securing screw and rotate air shutter to allow more or less airflow.
Closing the shutter will produce a more yellow flame but may soot.
Propane Connection:
1. Make sure the tank & key valves are turned completely off (clockwise).
2. Ensure the tank has the proper external mating threads (tank valve marked "USE WITH TYPE 1").
3. Inspect the hose shipped for any damage. Do not use if damage is suspected.
4. Connect the regulator assembly to the tank valve. Hand tighten only (clockwise). Do not use a wrench
to tighten! Use of a wrench may damage the quick closing nut and result in hazardous condition.
5. Slide tank into position inside table frame. Make sure hoses are not restricted or pinched.
6. Double check all fittings for tightness. Refer to the Instruction Manual (Step 5) for complete information
regarding checking for gas leaks.
6. Refer to the Instruction Manual (Step 6) for complete information on Lighting and Operation. For your
safety,
READ BEFORE LIGHTING
.
Fire Table Assembly Instructions
Refer to inclosed Crystal Fire Instruction Manual
for complete safety and installation instructions.