
User guide


C
HAPTER
4: U
SING THE
W
EB
I
NTERFACE
47
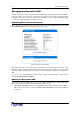
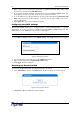
Figure 55 Basic Network Settings Panel
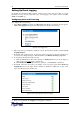
2. Type a new name in the Device Name field.
3. Click Apply. The Revelation PDU is renamed.
2 %
The Revelation PDU was configured for network connectivity during the installation and
configuration process (refer to Chapter 2 for details). If necessary, you can modify any of these
settings. To do this:
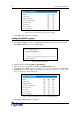
1. Select Device Settings, and then select Network. The Network Settings window appears.
The left side of the window consists of the Basic Network Settings panel, which shows the
current network settings. Refer to Figure 55 for a picture of this panel.
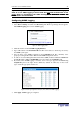
2. Do one of the following:
− Auto configuration To auto configure the Revelation PDU, select DHCP or BOOTP
from the drop-down list in the IP Auto Configuration field. If you select DHCP, you
can also enter a preferred host name (this is optional).
− Static IP To enter a static IP address, select none from the drop-down list in the IP
Auto Configuration field, and then enter:
IP address
Subnet mask
Gateway address
Primary and (optional) secondary DNS server addresses
3. When you are finished, click Apply. The network settings are modified.
$5'+2 %
You can use Telnet or SSH to log into the Revelation PDU’s CLP interface. However, by default
SSH is enabled and Telnet is not (because it communicates in the clear and is therefore not
secure). You can change this and enable or disable either application.
You can also set a bandwidth limit, and change any of the default port settings. Finally, you can
enable or disable the Raritan Setup Protocol.